DRUM LESSONS
1968 Toronado Front Drum To Disc Brake Conversion
|
|
DRUM LESSONS |
|
|
1968 Toronado Front Drum To Disc Brake Conversion |
||
| Ralph Braun, President of the OCA* Toronado Chapter, wrote: |
|||
| "Many of our Toronado owners have installed disc brakes." | |||
| Mark P., well-known Generation One Toronado Expert, wrote: |
|||
| "My Toros have been daily drivers, and the discs are far superior to the drums." | |||
| Ray A., whose 1966 Toronado recently had its front brakes converted to discs, wrote: |
|||
| "That's how I did mine, and I have more stopping power than I can use." | |||
| *Oldsmobile Club of America | |||
 After 35 years of wishing and 2 years of actively searching
for a 1968 Toronado in great condition and reasonably close to my home in
Michigans Upper Peninsula, the planets must have aligned over my house because
I found one for sale only 250 miles away in Eau Claire, Wisconsin. It was
January, 2004, and Jay Lenos schizophrenic Toro-vette was still a secret
project. A friend winged me to Eau Claire in his Piper turbo Comanche, the
seller and I struck a fair deal, and then I began the long drive to bring the
new big baby home.
After 35 years of wishing and 2 years of actively searching
for a 1968 Toronado in great condition and reasonably close to my home in
Michigans Upper Peninsula, the planets must have aligned over my house because
I found one for sale only 250 miles away in Eau Claire, Wisconsin. It was
January, 2004, and Jay Lenos schizophrenic Toro-vette was still a secret
project. A friend winged me to Eau Claire in his Piper turbo Comanche, the
seller and I struck a fair deal, and then I began the long drive to bring the
new big baby home.
Before the purchase I knew very little of the Toronados history, engineering, and characteristics. I just knew I liked the unique appearance, and that they were front wheel drive land yachts. For the past decade, offerings from Detroit, Japan, and Europe have been, with very few exceptions, indistinct, so I didnt want any. Cars from this Toronados era could be discerned simply by looking at the grille or taillights, even the model year. While driving back home through the Wisconsin countryside, it became readily apparent that slowing and stopping my new Toronado was an issue. Not that I was speeding; instead there must have been low brake fluid or some other problem I didnt know about.
I did eventually make it home, but it was rather scary because of the anemic brakes. The next day I took it to Midas brake shop. $350 later, stopping power seemed better. But the technician did mention something about how the product of a barreling 4,800 pound car, times 4 drum brakes, equaled an uncertain outcome. He also said that many owners of 60s muscle cars upgraded their cars to disc brakes.
I set out learning everything I could about this. First stop: the internet. Thankfully, with minimal effort I found out about the Toronado Chapter, then the Toronado E-mail List, then Diskenstein! Also, I began buying vintage car magazine issues featuring the Toronado. Fortunately, these were plentiful on eBay. Interestingly all the writers, while praising Toronados advanced drivetrain, uniformly disparaged its brakes. Check out the following excerpts:
| article entitled: | Oldsmobile Toronado |
"Speaking of brakes - well, maybe we shouldnt. They are a major failing in this car. Total swept area is only 328 square inches, the same as that of pre-disc Corvettes, though there is more lining area. On our brake tests, we managed only a 20 ft/sec/sec deceleration rate on the panic stop, and control over the direction of the cars travel during the stop was a hectic proposition. The problem here seems to be twofold: not enough brake power at the front, where rests probably more than 70% of the cars high weight during such a stop; and too much brake power at the rear. To be exact, the front brakes do 62% of the work, which seems to small a proportion. We can offer some suggestions here: it would seem that discs are a must for the front, for one thing. Non-servo drums at the rear would be a step in the right direction, as they are less prone to lockup (which the present rear ones do very easily). And this car seems to be one of the leading candidates for a pressure limiting device for the rear brakes; most of the worlds front-drive cars already have them." |
||
| magazine: | Road & Track | |||
| issue date: | January 1966 | |||
| article entitled: | Autocar Road Test |
"As with most American cars, the Achilles heel of this one lies in its braking system, which for British and European road conditions is quite inadequate. One can get away with using them little and often, since their cooling is apparently sufficient for this, but one full-energy stop from 90-100 mph has them cooked beyond capacity long before the car has come to rest. Even in dry weather the need for an abrupt stop can be a bit unnerving, as the self-wrapping shoe action is liable to lock the back wheels and slew the tail. Since there is no pressure limiting valve between front and rear systems, the braking stability is at its best with the petrol tank full and a good load on board. "Fortunately this big and heavy cars handling characteristics are such that one can move very quickly and safely from A to B without depending much on the brakes." |
||
| magazine: | Autocar | |||
| issue date: | January 1966 | |||
| article entitled: | Toronado vs. Riviera: An On-the-Road Comparison | "The Riviera scores mightily over the Toronado in the braking tests . . . The Toronado was accompanied by rapidly building brake fade." | ||
| magazine: | Car Life | |||
| issue date: | February 1966 | |||
| article entitled: | Oldsmobile Toronado Road Test |
"If the Toronado has very adequate go, it also has inadequate stop. The engineering which resulted in the Toronados drive system should have been extended to the cars braking system. Drums of 11-in. diameter and shoes of 2.75 in. width in front and 2 in. width in the rear provide a total swept area of 328.2 sq. in. This is insufficient for a car whose gross weight is in excess of 5400 lb. when fully passengered, fueled, and conservatively cargoed. In two intentional panic stops from 80 mph, the Toronado brakes demonstrated unacceptable fade characteristics, that is, lockup which induced noisy slides and anything but straight-line deceleration. A totally unintentional panic stop in a freeway situation left one Car Life driver with trembling hands, icy perspiration and a total lack of desire to drive the Toronado ever again . . . unless the car is given discs or a front discs / rear drums, with a limiting device (a la Thunderbird, Continental and Ford 7-Litre) to prevent rear-wheel lockup. The present drum system, without such limiting, allows the wheels under the light rear end to halt completely for sustained, squealing, squirming slides. All of this is in light of the statement by Oldsmobile engineers: The Toronado does not need disc brakes. Car Life disagrees." |
||
| magazine: | Car Life | |||
| issue date: | February 1966 | |||
| article entitled: | The Truth about the Toronado |
"It has all the performance one is likely to crave up to a maximum speed of 128-130 mph, steers accurately (with one finger!), corners far flatter than most American cars but has the usual inefficient brakes, prone to severe fade if used hard from high speeds." |
||
| magazine: | Motor Sport | |||
| issue date: | August 1966 | |||
|
Engineers at Oldsmobile were obviously reading these reviews. Front disc brakes became optional beginning with the 1967 Toronado. Nevertheless, the criticism continued. |
||||
| article entitled: | Toronado: Big Wind | "Brakes are the ruling fact of Toronado life. With discs in the thing here now it seems inconceivable that Oldsmobile put all drums in their toy." | ||
| magazine: | Wheels | |||
| issue date: | April 1967 | |||
| article entitled: | Five Luxury Specialty Cars | "From all indications a Toronado with discs should be a show stopper." | ||
| magazine: | Motor Trend | |||
| issue date: | August 1967 | |||
|
Show stopper perhaps. But apparently Oldsmobile was still loaning drum brake-only Toronados to the auto magazine test-drive crews. |
||||
| article entitled: | Oldsmobile Toronado Road Test |
"In the past weve voiced disapproval of the Toronados brakes so we were sorry to see that no improvements have been made. Our first warning came during the acceleration tests when we faded the brakes completely while slowing for the first turn-off after four runs at Orange County Raceway. Smoke was pouring off the front brakes and we could just barely make the turn, normally no difficulty at all. All of this didnt establish a very promising precedent for the braking test. To obtain a quantitative measure of how bad the brakes really were, however, the test had to be made. Our pessimism manifested itself in the fact that we marked off 350 feet instead of the normal 250 for purposes of measurement. Drop back and let it happen. Much to everyones surprise, the Lansing Landcruiser stopped painlessly from 80 mph in only 238 feet (.90G). Certainly an admirable stop for such a big car. Maybe all that smoke a little while ago was a figment of someones imagination. With a little more optimism the second stop was approached. This time 270 feet at .79G. The fade was back and the driver was busy keeping the car in one lane. The third stop was the one. Describing the situation as mere violent instability would be too flattering. But for the quickness of the test driver, the guard rail along the strip was as good as gone, and a clean, one-owner Toronado would have soon been in need of cosmetic restoration. . . . Admittedly, the first stop was exceptional for such a big car but the fade encountered during the following stops and the disastrous lack of directional stability are totally inadequate for travel on crowded, high speed throughways. Instead of piping cold air into the [W-34 models] carburetor, Oldsmobile would do well to direct it towards the brakes." |
||
| magazine: | Car & Driver | |||
| issue date: | April 1968 | |||
| article entitled: | Citroën vs. Toronado | "The straightaway performance tests can be summed up in one sentence. One goes but doesnt stop, and the other stops but wont go." | ||
| magazine: | Sports Car Graphic | |||
| issue date: | May 1969 | |||
|
Despite the passage of forty years, car magazine writers still have neither forgotten nor forgiven Oldsmobiles design team for committing a major engineering blunder with their otherwise revolutionary Toronado. |
||||
| article entitled: | Rulebreaker: 40 Years On, Its Still The Most Radical Olds Ever | "The 1966s four-wheel drums are inadequate, making front-disc conversions popular." | ||
|
and |
||||
| magazine: | Motor Trend Classic | |||
| issue date: | October 2005 (Premier Issue) |
"We risked no hard stops, but the brakes are the cars Achilles heel. Consumer Reports even dubbed them unsafe in 1966, and most other published reports of the time criticized the four-wheel iron drums." |
||
| article entitled: | Affordable Classic: 1966-1967 Oldsmobile Toronado - How Can Muscle Car Collectors Overlook Anything This Big? | "Only the typically numb Saginaw power steering and drum brakes let things down, although discs became available in '67." | ||
| magazine: | Sports Car Market | |||
| issue date: | February 2006 | |||
By most accounts, disc brakes were standard equipment beginning with the Generation Two Toronado which debuted in 1971. However many if not most 69 and 70 Toronados were being ordered with disc brakes, making them a de facto standard for the 1970 model. Only then, I suppose, did the condemnation stop.
Next I sought the advice of other Generation One Toronado owners whose cars had undergone a drum to disc brake modification, as the Midas mechanic had first described to me. This is where the Toronado E-mail List was so valuable. Numerous current and former Toronado owners, knowledgeable enthusiasts all, tirelessly assisted me with answers to my many, many questions.
Ray A. responded, "I definitely recommend the front disc conversion. It is night and day from the front drums." Ron Z. replied, "The change in braking is amazing." There I had it from A to Z, and nearly a dozen other owners in-between concurred as well. I was convinced, so the next step was to learn about the parts required, the conversion process, and any pitfalls to avoid.
To begin, I thoroughly reviewed Mark Ps excellent website:
http://www.hydro-motive.com/toronado
He and Ray A. provide an authoritative primary source document, including photographs of a disc brake transformation process. To access it, click on Diskenstein.
After deciding to pull the trigger on a disc brake conversion project, several crucial decisions had to be made. The purposes of this article are first to summarize what Ive learned for the benefit of those contemplating a similar undertaking, second to expand upon Diskenstein by describing my Toronados conversion, third to present a collection of fascinating historical reviews from the automotive literature, and fourth to stimulate new discussion in an attempt to definitively resolve one remaining issue.
The recommendations given here are based upon facts, my experience, and the sound consensus of members of the OCA Toronado Chapter, the Toronado E-mail List, and the newly formed Toronado Owners Association (TOA). See:
Click on the TOA Fact Sheet link which is located on the left side of its homepage screen. I strongly advise joining the TOA, as well as participation in the E-mail List.
The first major decision concerned converting all four wheel or just the front? There are several valid reasons for converting the front wheels only. First, since the majority of the Toronados weight is concentrated over vehicles front axles, these wheels are therefore responsible for providing the majority of the braking force. In fact, as described on page 5E-11 of the Toronado Chassis Service Manual Supplement published by none other than General Motors, the percent braking effect contributed by the front wheels is 67%, and the rear wheels is 33%. Although not scientifically studied, I believe that there would not be a significant improvement in stopping power of a four-wheel disc conversion compared to a front-wheel-only conversion, especially considering the more than substantial increase in complexity, effort, and cost of a four-wheel. Second, converting the rear wheels to disc brakes results in relinquishing either the emergency brake, or another ton of additional time and money for the professional welding and metal fabrication necessary to retain its functionality. And third, considering the additional expenditure to convert the rear wheels (even if forgoing retention of the emergency brake), perhaps a better return on investment would be high quality brake shoe linings properly arced for their drums, and four technologically advanced new tires. Based upon this logic, I selected just a front-wheel conversion.
To be fair and balanced, I must include the opinion of one Toronado E-mail List naysayer who believes that disc brakes are unnecessary provided . . .
| "You want the SOFTEST composite lining you can get. NON metallic." | |||
|
"You must, MUST, have the brake linings after they are mounted on the shoe, ARCED!!!!! You need to find a guy with a brake shoe arcing machine!!!!! Thats the bottom line baby!" |
|||
|
"Get a GOOD drum brake job done and . . . your Toro will stop on a dime and give change!" |
|||
Im withholding the identity of this opinionated contrarian so he wont be embarrassed. But any earnest effort to get an early Toronado to stop on a dime would cause smoke and sparks to fly out from the baked brakes. See again the quote from Car & Drivers April 1968 Oldsmobile Toronado Road Test.
The second major decision entailed whether to buy new parts, or use everything from a salvage yard donor car. This is discussed in detail in Section II.
And third, having neither the tools, time nor expertise, I had to find somebody local willing to do it. This decision is explained in Section III.
II. PARTS
Complete disc brake conversion kits can be purchased for many
popular classic and muscle cars, but unfortunately not for our Generation One
Toronados. InLine Tube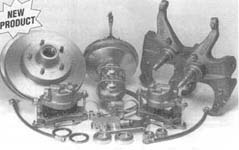 and Stainless Steel Brakes Corp. sell these kits on their
web sites, which are worth reviewing since both sites also present technical
information, detailed part descriptions, magazine article reprints, and answers
to frequently asked questions.
and Stainless Steel Brakes Corp. sell these kits on their
web sites, which are worth reviewing since both sites also present technical
information, detailed part descriptions, magazine article reprints, and answers
to frequently asked questions.
Since a one-stop shop solution does not exist for our Toronados, parts must be obtained from multiple sources. An undeniable fact is that our cars are not in the same league of popularity as 1960s Mustangs, Corvettes, Firebirds, etc. The result is often incorrect and conflicting information at the neighborhood parts retailer service counter. This article presents the findings compiled from over a year of exhaustive research into this complex endeavor.
The primary fundamental parts issue is compatibility. Oldsmobile redesigned several interrelated wheel, suspension, steering, and brake parts during Toronados Generation One and Two production runs. This includes the master cylinder, steering knuckles, upper control arms, upper and lower ball joints, outer tie rod ends, axle half-shafts, brake calipers, wheel bearings, and the wheels themselves. Because extremely knowledgeable Toronado enthusiasts have differing opinions on when certain parts were changed, I deduce that within the same model year, it is possible that some components may have different designs to reflect leftover inventory from the prior year, or early implementation of engineering improvements slated for the upcoming year. This is the one remaining concern mentioned previously.
Here is a sampling of quotations from several Toronado E-mail List contributors illustrating changeover year disagreements.
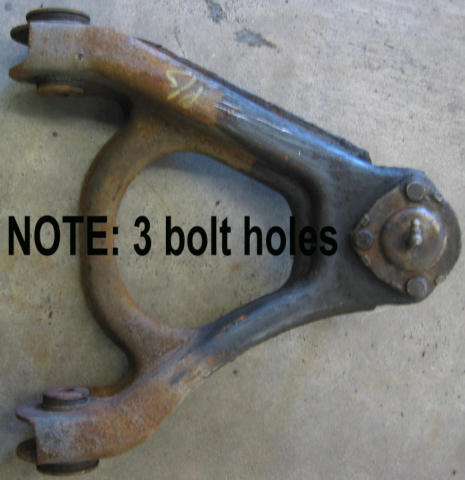
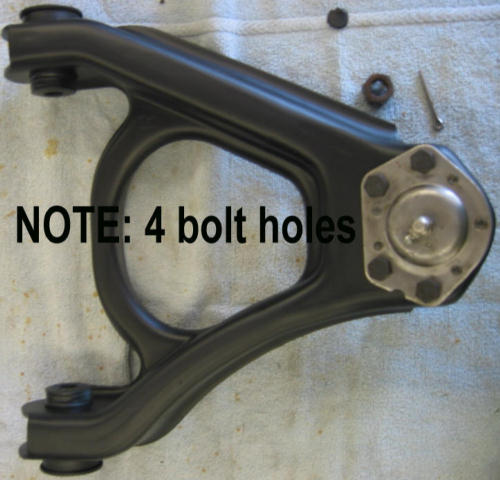
| "In 1973 GM changed the upper ball joints from a 3 bolt design to a 4 bolt design." | |||
|
"The upper ball joint stud was changed in mid year 1969 and the knuckles are different at the ball joint stud boss. The upper control arms are the same . . . from 67 to 78, I think, with one change in 74. Before 74 the upper ball joint was secured with three rivets, 74 up with four rivets." |
|||
|
"Upper and lower ball joints, and outer tie rod ends go through some changes. I cant keep it straight in my head right now, but I think the outer tie rod ends change in 69, the upper ball joints in 71, and the lower ball joints in 69. Dont hold me to that, though!" |
|||
It would be worthwhile to hold discussions, arrive at a consensus if possible, and create a definitive chart documenting the design changeover points for these components. Later in this section I describe how I attempted to resolve this uncertainty for my project. Fortunately, there is general agreement regarding the changeover point for axle half-shafts, wheel bearings, brake calipers and rotors.
The disassembly phase of the conversion presents a perfect time to inspect parts susceptible to damage or failure. Chief among these are wheel bearings and axle half-shafts, since their removal at any other time presents a considerable expense. In contrast, comparatively little added time is needed once the steering knuckles are both removed. Axle half-shafts need not be replaced, unless damaged beyond repair.
The 1966 axle half-shafts were a one-year-only design that was changed beginning with the 1967 Toronado then remained the same until the end of Generation Two. There are several design differences, the major one being the larger hub diameter of the 1966 half-shafts. Thats the part that bolts to the final drive.
Remanufactured 1966 half-shafts are not available. Owners of 1966 Toronados have a few options. If serviceable, they can be rebuilt. Or 1967-1978 half-shafts can be purchased from either a salvage yard or a remanufactured parts retailer. If 1966 Toronado owners are unable to utilize their 1966 half-shafts, then there is an additional incompatibility issue. Thankfully this one has been satisfactorily resolved.
1967-1978 half-shafts are incompatible with 1966 Toronados unless special adapter rings are installed. Dick Taschenberg of RT Engineering sells custom-manufactured adapter rings that are positioned between each side of the 1966 Toronados final drive and the hubs of the 1967-1978 half-shafts, which are otherwise too small. The 1967-1987 half-shafts will also require longer final drive attach bolts due to their thicker flange. None of these are needed if your car is 1967 or later. RT Engineering does not have a website (yet), but a catalog can be obtained directly from Mr. Taschenberg:
rtemd@earthlink.net
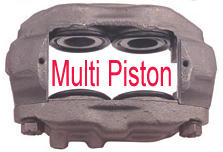
 The secondary fundamental parts issue is availability.
Mentioned earlier was that front disc brakes were first offered on the 1967
Toronado. The
1967 and 1968 factory-installed disc brake system utilized an inferior
multiple-piston caliper design that is best avoided as parts are less available
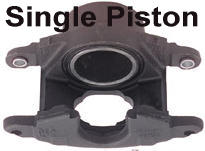
and more expensive, and the overall brake design is troublesome. The
floating single-piston caliper that was introduced in 1969 is simple and
effective, replacement parts are easily obtained, and they cost much less than
the earlier design. Furthermore, replacement rotors for 1967 - 1968 Toronado are
completely unavailable. These rotors were cast as part of the hub, so the
whole thing has to be replaced when the rotor wears beyond serviceability. Since new or
remanufactured ones simply do not exist, replacements, if still available, must come from a salvage yard. And
rarely, if ever, are they.
The secondary fundamental parts issue is availability.
Mentioned earlier was that front disc brakes were first offered on the 1967
Toronado. The
1967 and 1968 factory-installed disc brake system utilized an inferior
multiple-piston caliper design that is best avoided as parts are less available
and more expensive, and the overall brake design is troublesome. The
floating single-piston caliper that was introduced in 1969 is simple and
effective, replacement parts are easily obtained, and they cost much less than
the earlier design. Furthermore, replacement rotors for 1967 - 1968 Toronado are
completely unavailable. These rotors were cast as part of the hub, so the
whole thing has to be replaced when the rotor wears beyond serviceability. Since new or
remanufactured ones simply do not exist, replacements, if still available, must come from a salvage yard. And
rarely, if ever, are they.
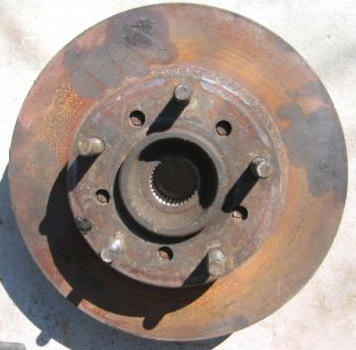
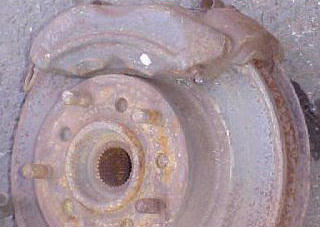
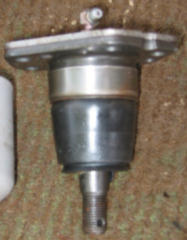
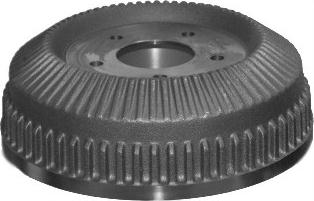
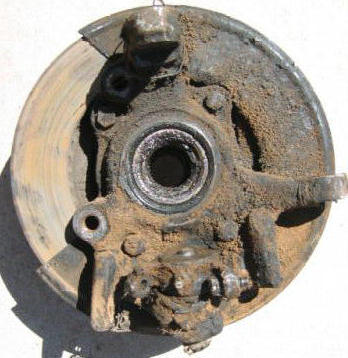
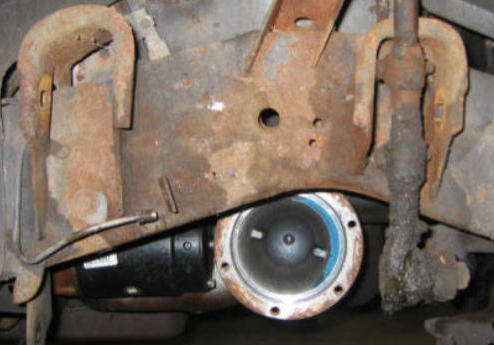
|
Hub and rotor are a single casting. |
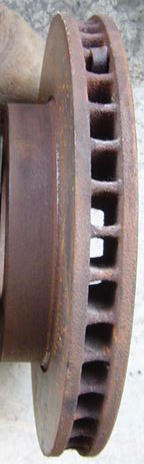 |
Multi-piston brake caliper attached. (Sorry - bad photo) Further down in this report are photographs of Generation Two components, which consist of a separate hub and rotor, and a single piston caliper. |
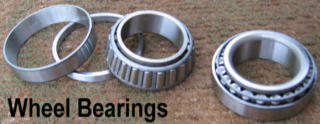 As with calipers and rotors, front wheel bearings were also redesigned beginning
with the 1969 Toronado. 1966-1968 front wheel bearings, though still
available new, are considerably more expensive than those for 1969-1978
Toronados. And I
strongly recommend new bearings. If you use salvaged bearings to save $100
or so, then youll spend much more to have these old bearings replaced if they
fail. And since there is
always a risk that manufacturers may discontinue production of these and other
parts for older cars, consider purchasing an extra bearing or two.
As with calipers and rotors, front wheel bearings were also redesigned beginning
with the 1969 Toronado. 1966-1968 front wheel bearings, though still
available new, are considerably more expensive than those for 1969-1978
Toronados. And I
strongly recommend new bearings. If you use salvaged bearings to save $100
or so, then youll spend much more to have these old bearings replaced if they
fail. And since there is
always a risk that manufacturers may discontinue production of these and other
parts for older cars, consider purchasing an extra bearing or two.
Because 1969-1978 rotors and front wheel bearings are readily
available new, and 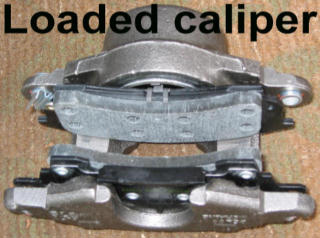 remanufactured calipers are also widely available, the model
year of the salvage yard donor car should be 1969 or later. That way, if you
initially obtain salvaged rotors and bearings, and theyre unserviceable or ever
fail, purchasing new replacements remains a viable solution. And if purchasing
remanufactured calipers, select loaded calipers since theyre complete with
pads, bushings, bolts and other necessary hardware. And make sure to order one
left and one right. Theyre different part numbers.
remanufactured calipers are also widely available, the model
year of the salvage yard donor car should be 1969 or later. That way, if you
initially obtain salvaged rotors and bearings, and theyre unserviceable or ever
fail, purchasing new replacements remains a viable solution. And if purchasing
remanufactured calipers, select loaded calipers since theyre complete with
pads, bushings, bolts and other necessary hardware. And make sure to order one
left and one right. Theyre different part numbers.
So besides calipers, rotors and bearings, exactly what other
parts are required, and where can they be located? And should these parts
be new, remanufactured, or from a salvage yard? And wouldnt salvaged
parts be rusted, cracked, or otherwise unroadworthy? Disappointingly,
several key parts will only be available from a salvage yard. They are the
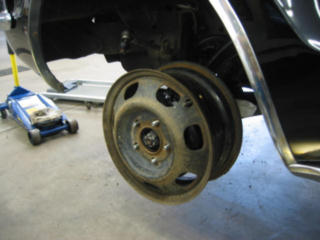
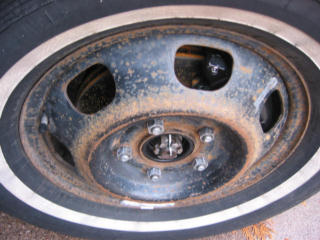
steering knuckles, upper control arms, and disc brake-compatible wheels.
Thats right, wheels factory-installed on drum brake hubs cannot be used with
disc brakes because they will not clear the calipers.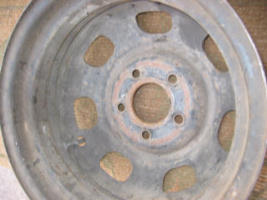
How many wheels to purchase is a personal choice and financially driven decision, especially if theyre being shipped to you from the salvage operator (theyre heavy). Purchase at least two. Consider a third one for use with the spare tire, because your drum brake wheel spare tire will not fit if one of your disc brake wheel tires goes flat. Luckily the disc brake wheels will fit over drum brakes, so converted Toronados need not haul two different spares in the trunk.
Decide on the quantity based upon your projects long-term needs. I purchased only two. Since I have upcoming plans to upgrade all four wheels to 17 inch customs, once thats done Ill only need one of the two I purchased, for use as the spare. Upgraded wheels will be the topic of a future article, by the way. Meanwhile, I accept the risk that a front tire flat means a potentially expensive tow instead of a simple roadside change to the spare. Ill just keep it this way until the custom wheels arrive. When they do, my 1 unneeded disc wheel and 5 unused drum wheels will all go onto the eBay auction block.
Since the Toronado E-mail List consensus
recommendation is to acquire the single-piston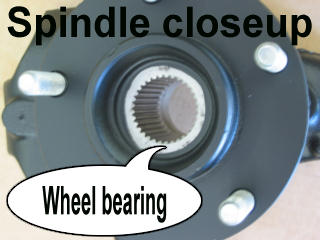 calipers utilized from 1969 to 1978, regardless
 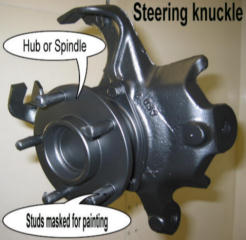 of
which model year Toronado youre upgrading from front drum brakes, this will
necessitate obtaining 1969-1978 steering knuckles and upper control arms.
Otherwise the calipers will be incompatible. Make sure the steering
knuckles include hubs (the rotating part onto which the rotors and wheels
attach). Now there is some part-naming indefiniteness. Some refer to
the steering knuckles as spindles, and some refer to the hubs alone as spindles.
Perhaps the spindle is best defined as the hub & wheel bearing assembly. I
cannot resolve this issue, other than to provide photographs of what you need.
of
which model year Toronado youre upgrading from front drum brakes, this will
necessitate obtaining 1969-1978 steering knuckles and upper control arms.
Otherwise the calipers will be incompatible. Make sure the steering
knuckles include hubs (the rotating part onto which the rotors and wheels
attach). Now there is some part-naming indefiniteness. Some refer to
the steering knuckles as spindles, and some refer to the hubs alone as spindles.
Perhaps the spindle is best defined as the hub & wheel bearing assembly. I
cannot resolve this issue, other than to provide photographs of what you need.
Throughout this article are photographs of everything. To ensure compatibility, make sure all your salvage yard parts are from a single Toronado, and make sure you are informed what model year theyre from, especially if youre not physically present during the parts removal process. Later youll read how my not knowing what model year Toronado was the donor car for my conversion, led to a tremendous waste of time and money. Learn from my error.
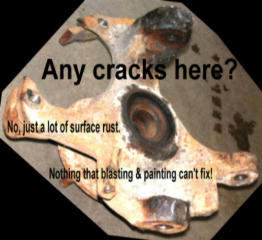
The condition of these salvage yard parts may not be pretty (refer to the photographs below). But once sandblasted (or bead blasted - whichever you believe is best), primed and painted, youll swear they just came off the assembly line in Lansing. Note in the photos that I didnt have the disc brake wheels blasted and painted because theyre temporary. However the one wheel that I will save for use as the spare will eventually be cleaned up and repainted.
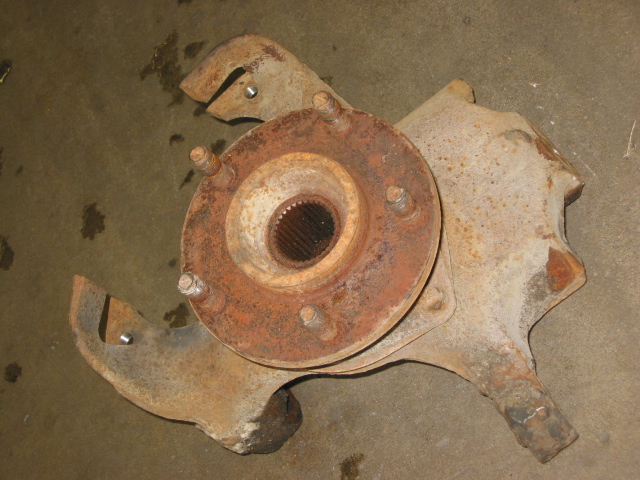
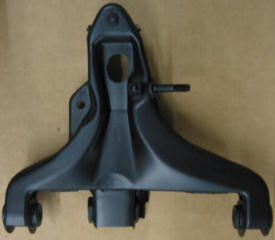
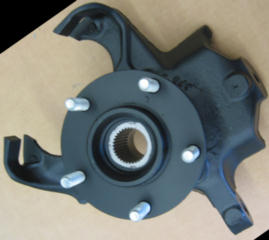 Same steering knuckle as above, showing before and after sandblasting and painting. |
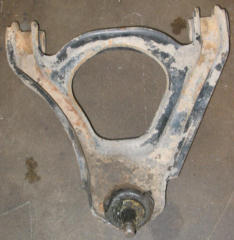
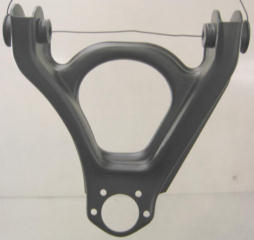 Upper control arm, before and after. |
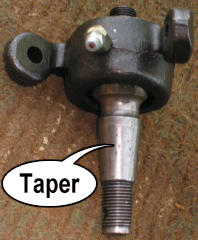
Much more complex is the conundrum encompassing steering knuckles, control arms and ball joints. The three Toronado E-mail List quotes at the beginning of this Section amplify the absence of a consensus. So when exactly during the production run did Oldsmobile change Toronados upper ball joints from 3 bolt holes to 4 bolt holes? And when did the upper ball joint studs taper change? Or was it the lower ball joint? Clearly, differences in ball joint bolt holes and stud tapers means differences in control arms and steering knuckles. How best to avoid incompatibility problems?
The obvious simple answer is to make sure the upper control arms and steering knuckles are obtained from the same model year Toronado. Preferably they should all be from a single donor car, to absolutely insure parts compatibility. Otherwise you may end up frustrated with expensive and heavy components that dont fit each other, and perhaps cannot be returned or exchanged.
But why all the fuss if your salvage yard parts are from a single Toronado? The issue is not so much the model year of the donor car, especially if you decide to use all four ball joints salvaged from the same donor car supplying the steering knuckles and upper control arms. Rather, the problem lies with availability and compatibility of new ball joints. And I recommend new ball joints for the same reason that I recommend new wheel bearings. Parts retailers databases may be incorrect, leading to delays in your project and possibly added expense if you hire a technician to accomplish the conversion as I did. Database errors may be due to the aftermarket industrys lack of familiarity with the automobile of our affection. And although an irrational thought, I fear that some Toronados that made their way down the assembly line early in any given model year may contain leftover parts from the prior year. One popular on-line parts retailer does not list ball joints until the 1973 model year. Suppose your parts are from a 1971 Toronado, then you decide to obtain new ball joints. Another on-line retailer does not provide an image of the lower ball joints it sells. Not very confidence-building, considering the potential time and effort wasted if the ones you receive are not the ones you need.
For what its worth, my lowly opinion on upper ball joints is: 1969 to 1973 = 3 bolt holes, and 1974 to 1978 = 4 bolt holes. If this could be verified, then the model year changeover point makes for a perfect mnemonic. Considering this is probably wrong, though, I have another recommendation. Instead of obtaining salvaged parts from a 1969 - 1978 donor car as suggested earlier, contemplate the merits of narrowing down to Toronados manufactured between 1975 and 1978. This assures compatibility, as any and all Toronado E-mail List disagreements seem to end with the 1974 model year. However, sheer availability may end up driving the decision of which model year Toronado is the source of your projects needs. And that means it could potentially be a 1973 or earlier.
|
|
|
The salvage yard source of my parts is Outlaw Auto, located in Roundup, Montana. Jeff Waymire, the proprietor, is knowledgeable about Toronados and apparently has a significant inventory of them. One fair warning: make absolutely sure that you and he agree upon what model year Toronado is the salvage yard donor car for your parts. Despite what his sources describe as interchangeable, certain parts from different model years are not, and that could lead to a massive waste of time and money, as it did for me. I recommend you contact him even after youve sent him the money order (which he requires in advance), because he may promise, for example, 1978 Toronado parts, but deliver incompatible parts from an earlier Toronado. More on this later. Mr. Waymire can be reached at:
Make sure the wheels, upper control arms and any other salvage
yard parts are free from cracks and damage. Unfortunately this may
 not
be seen until after theyre
not
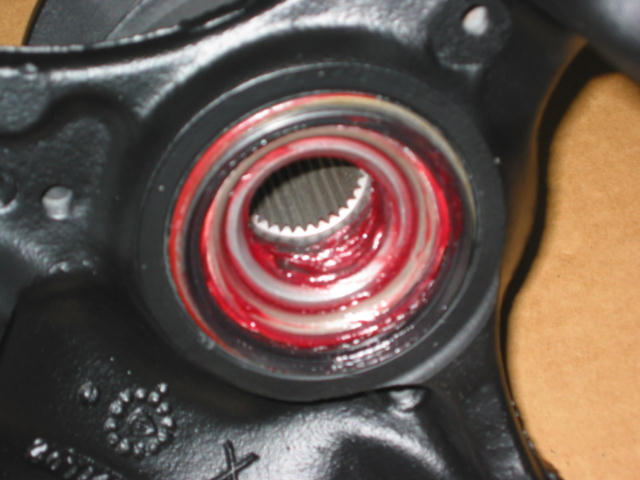
be seen until after theyre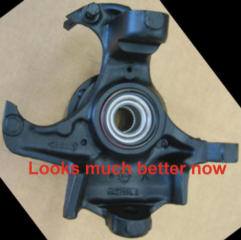 sandblasted. The salvaged steering knuckles I bought were completely
disassembled, blasted, painted, then reassembled using new wheel bearings, inner
and outer bearing seals, and wheel studs. See my before / after photos
here and above.
sandblasted. The salvaged steering knuckles I bought were completely
disassembled, blasted, painted, then reassembled using new wheel bearings, inner
and outer bearing seals, and wheel studs. See my before / after photos
here and above.
Once again, the upper control arms and upper ball joints must have the same number of bolt holes. Oldsmobile changed their configuration and bolt-hole count, and this proved to be a very expensive lesson for me. I ordered 1978 salvage parts from Outlaw Auto, and 1978 new parts (ball joints, for example) from Auto Zone. When everything arrived, I didnt inspect the various parts for compatibility before handing everything over to the restoration shop (more about where to have your Toronados brake work done later in this article). Both upper control arms from Outlaw Auto underwent a general cleanup, removal of their old bushings in a bushing press, removal of the old upper ball joints, then were sandblasted. Next a new upper ball joint was test fitted, and to my horror, my new four-bolt-hole ball joints wouldnt attach to the three-bolt-hole upper control arms! How could that have happened? Neither the technicians nor I had checked this prior to their several hours of labor to clean up and ready the control arms.
I contacted Outlaw Auto to inquire what year upper control arms were actually sent to me. The proprietor was apologetic, stating that he substituted earlier model year parts (actual year he could not recall) for the 1978 upper control arms that I had requested. His defense was that he consulted an interchangeability guide. Obviously his guide was incorrect, or perhaps he misread it. He eventually sent me both four-bolt-hole upper control arms without charging me for these parts or their shipping, which was a nice gesture. He did not respond to my request for partial reimbursement for my several hours of wasted labor cost to prep the wrong ones he mistakenly sent me first. I believed I was being reasonable in requesting partial compensation only; obviously he thought otherwise. So, dear readers, when doing business with Outlaw Auto or any salvage yard, you now know the risks involved with buying parts sight unseen. It also took him a month to get the correct parts to me, so the Toronado brake project was on hold while I seethed over this very expensive mistake.
The Outlaw also admitted that the steering knuckles werent from a 1978 either. 72, he believes. In the back of my mind I considered the fact that I paid for 78 parts, made from 78 steel. My actual parts are six years older. Thats six more years of 4800 pounds pummeling through punishing potholes in Peoria. Stress cracks bring down airliners. All else being equal, newer metal is probably better. Nevertheless, I chose not to make this a bigger issue with Outlaw because I may need other parts in the future and he may be the only source. Outlaws owner never intended malice. But buyer beware is a universal truth, and a blood-boilingly harsh lesson.
I couldnt simply obtain three-bolt-hold upper ball joints because of the possibility of incompatibility with the steering knuckles he sent me. And also the fact that these knuckles had already been disassembled, sandblasted, painted, etc. Besides Outlaw agreed to provide and ship me the correct control arms without charge. Continuing with the original plan was the only option.
This snafu, in retrospect, reaffirmed my decision was to obtain new and remanufactured parts where possible. Although every part needed is available from the salvage yards donor car, I preferred the warranty, exchange privileges, and added security (although perhaps just imaginary) provided by new parts, even though the overall cost was higher. Several parts are unavailable new. These are the disc brake calipers and combination booster / master cylinder, which are available remanufactured. You have the choice of buying these from the salvage yard and cleaning them up, or buying them as remanufactured parts from a distributor such as Rock Auto. Remanufactured parts will cost more than salvaged, but there will be a warranty and exchange privileges if something turns out to be incompatible. Theyll already be clean, saving sandblasting labor charges, and in good working order, saving future surprises. Below is a table outlining what parts are required, where they can be obtained, and what I paid for each in early 2005.
| Necessary Conversion Parts | ||||||||
|
Availability |
Part Name |
Manufacturer (1) |
Part Number (2) | Quantity Required | My Source | Item Total (3) | ||
|
Salvage |
Reman. |
New |
||||||
|
X |
Disc brake compatible wheels |
2 - 3 |
Outlaw Auto |
50 | ||||
|
X |
Steering knuckles |
2* |
Outlaw Auto |
70 | ||||
|
X |
Upper control arms |
2* |
Outlaw Auto |
50 | ||||
|
X |
X |
Loaded calipers |
Raybestos (4) |
L = RC4168 R = RC4167 |
2* |
Rock Auto |
131 | |
|
X |
X |
Combination booster / master cylinder |
AC Delco |
50-1002 (5) |
1 |
Rock Auto |
115 | |
|
X |
X |
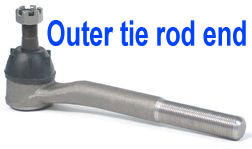
Outer tie rod ends |
Moog |
ES412RL (6) |
2 |
Rock Auto |
86 | |
|
X |
X |
Rotors |
Raybestos |
5802 |
2 |
Rock Auto |
40 | |
|
X |
X |
Wheel studs |
Dorman |
610-258 |
10 |
Rock Auto |
10 | |
|
X |
X |
Upper ball joints |
Duralast |
FA920 (7) |
2 |
Auto Zone |
72 | |
|
X |
X |
Lower ball joints |
Duralast |
FA673 |
2 |
Auto Zone |
100 | |
|
X |
X |
Upper control arm bushings |
Duralast |
FB290 |
4 |
Auto Zone |
36 | |
|
X |
X |
Lower control arm bushings |
Duralast |
FB319 |
4 |
Auto Zone |
76 | |
|
X |
X |
Wheel bearings |
Timken |
A 23 |
2 |
Auto Zone |
100 | |
|
X |
X |
Wheel bearing inner seals |
Timken |
5109 |
2 |
Auto Zone |
24 | |
|
X |
X |
Wheel bearing outer seals |
Timken |
5123 |
2 |
Auto Zone |
9 | |
|
X |
X |
Rubber brake hoses |
Brakeware |
L = 88497 R = 88498 |
2* |
Auto Zone |
58 | |
|
X |
X |
Proportioning valve |
InLine Tube |
PR-100 |
1 |
InLine Tube |
85 | |
|
X |
X |
Brake light lead wire |
InLine Tube |
PR-201 |
1 |
InLine Tube |
8 | |
| FOOTNOTES: (1) This is what I bought. In some circumstances there is a choice of different manufacturers. (2) According to aftermarket supplier, not necessarily the GM part number. (3) In $, not including sales tax or shipping costs. (4) Remanufactured by Raybestos. Originally manufactured by who? AC Delco? Raybestos? I dont know. (5) This is RockAutos part number, not AC Delcos. (6) Interestingly, the left and right outer tie rod ends are identical. (7) Moog, AC Delco, etc. may have different part numbers. Parts retailers can help if you want AC Delco. * more precisely: one left and one right. |
TOTAL: |
1,120 | ||||||
Rock Auto, Auto Zone, and InLine Tube all have excellent web sites, which I used to purchase nearly everything except the salvage yard donor car parts and a few items purchased locally that I didnt know were needed until the actual conversion started. See:
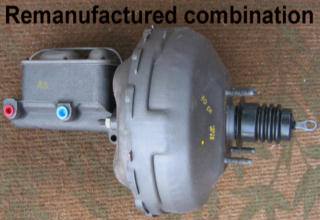
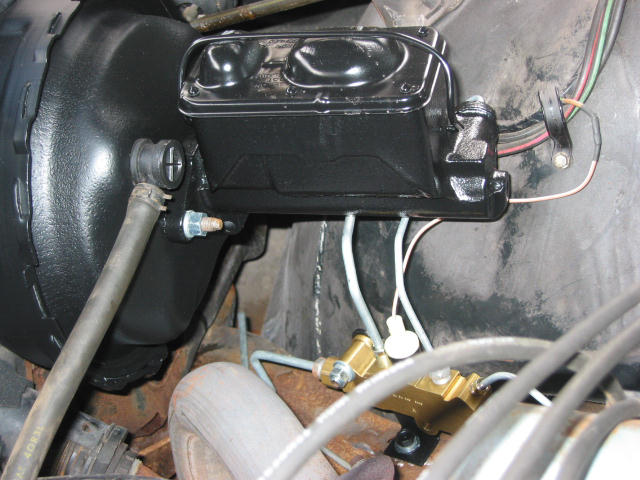
The original power brake booster and master cylinder from a four-wheel drum brake Toronado is not compatible with the front-discs rear-drums arrangement. Fortunately, the correct combination booster / master cylinder is available on a remanufactured basis, and the supply is plentiful. Plus, these are available bolted together as a single unit, greatly facilitating installation.
What now follows are discussions and/or photographs of each of the remaining parts on this list, all of which are available new. And I recommend they are purchased new, again because of the warranty, exchange privileges, and added security (although perhaps just imaginary). For detailed descriptions and depictions of each parts purpose, how it functions, and what connects to what, I refer the reader to the Haynes Automotive Repair Manual (book # 38030 covers the 1971 through 1985 Toronado), and the Toronado Chassis Service Manual Supplement for your model year. Both are available new or used. Try your local car parts retailer, eBay, or:
 The next thirteen items in this parts list were all purchased
new for my project. Warranty, exchange privileges, and an intangible
peace-of-mind value associated with new metal were my reasons why. And my auto
insurance claims adjuster friend insisted, convincing me that unworn parts might
perform better in extreme conditions like a panic stop. This turned out to be a
wise decision because of an incompatibility problem with both outer tie rod
ends. Auto Zone took back the incorrect ones I initially ordered without
question, even
The next thirteen items in this parts list were all purchased
new for my project. Warranty, exchange privileges, and an intangible
peace-of-mind value associated with new metal were my reasons why. And my auto
insurance claims adjuster friend insisted, convincing me that unworn parts might
perform better in extreme conditions like a panic stop. This turned out to be a
wise decision because of an incompatibility problem with both outer tie rod
ends. Auto Zone took back the incorrect ones I initially ordered without
question, even 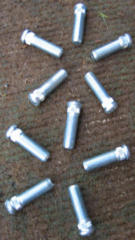 though I did not get
around to returning them until over four months after I received them. By
the way, Auto Zone ships for free, but charges sales tax since theres a store
located in every state. Rock Auto charges for shipping, but no sales tax
unless you live in Wisconsin.
though I did not get
around to returning them until over four months after I received them. By
the way, Auto Zone ships for free, but charges sales tax since theres a store
located in every state. Rock Auto charges for shipping, but no sales tax
unless you live in Wisconsin.
Rotors are still manufactured because multiple domestic vehicles utilize the same five on five bolt pattern as our Toronados. And speaking of bolts, also known as studs, theyre inexpensive so why not replace them during the re-assembly process. The upper and lower ball joints were previously described. Upper and lower control arm bushings are wear items, so replacing them while all the suspension components are disassembled is a worthwhile endeavor, just like the wheel bearings described above. And while replacing the bearings, use new bearing seals. Theyre also inexpensive.
The flexible break hoses that are situated between the hard brake lines and the calipers should also be replaced, since theyre also wear items and your life may depend upon them. I chose rubber rather than metal braided hoses, which was just my personal preference not based on engineering or safety studies. The truth is that I purchased these before I learned that braided ones are available. In the future I may upgrade to braided flexible brake hoses.
|
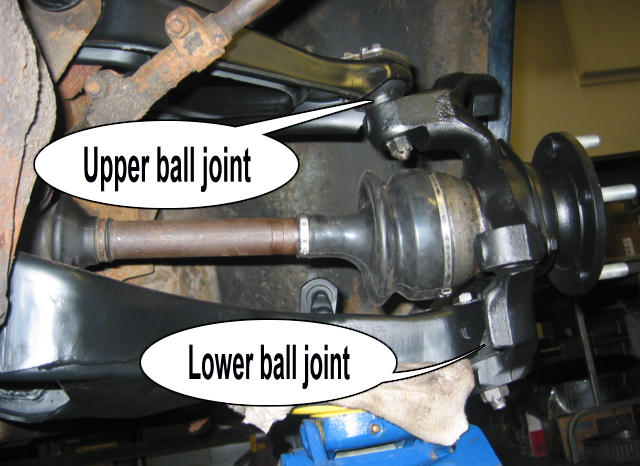
Upper ball joint |
Lower ball joint |
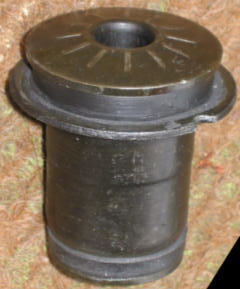
Upper control arm bushing |
Lower control arm bushing |
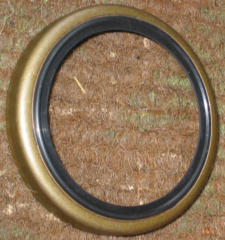  Wheel bearing seals (I forget which is inner and which is outer) |
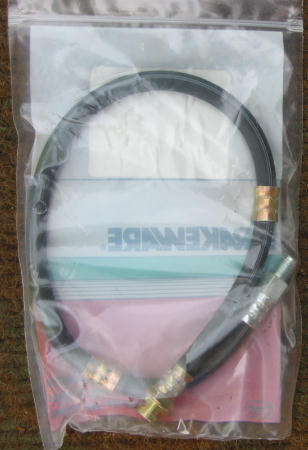 Flexible brake hose |
 Proportioning valve & lead wire |
|
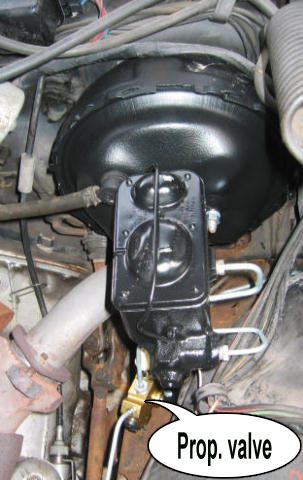
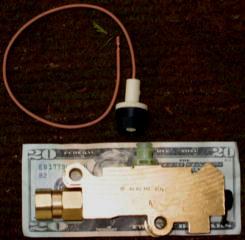
Much can be written about proportioning valves. Actually, much has already been written. Go to InLine Tubes website, and click on the Proportioning Valves link which is located on the left side of its homepage screen.
The proportioning valve takes the place of every other valve and block in the system, with the singular exception of the small distribution block located just ahead of the rear axle which divides the hydraulic brake fluid pressure into the right and left rear brake lines to their respective drum brakes. Sorry I dont have a photo of that.
Connecting to the top of the proportioning valve is an electrical component that InLine Tube ambiguously calls the "brake light lead wire." The website further describes it as a "brake light switch connector and wire." Despite the name and description that suggest the following function, it is not a connection that causes the cars tail lights to illuminate when the driver steps on the brake pedal. Rather, it is a connection that causes the dashboards BRAKE warning light to illuminate when there is insufficient hydraulic brake fluid pressure. InLine Tube charges for shipping, but no sales tax unless you live in Michigan.
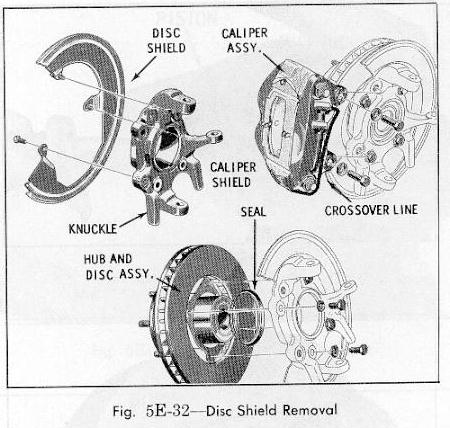
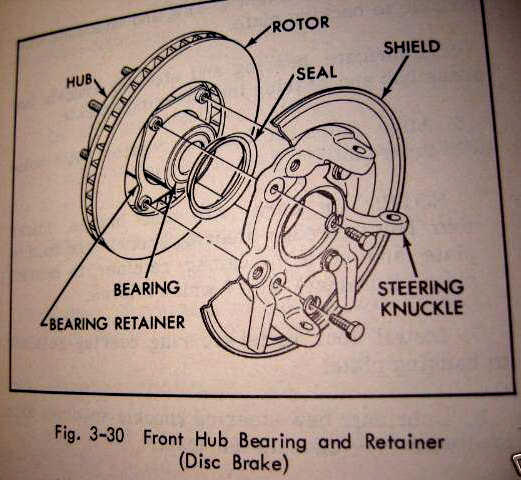
 Not in the parts list are rotor
splash shields. Although Generation One Toronados disc brake assemblies
included splash shields (as clearly seen in the below photograph and drawings),
apparently these were never part of Generation Two Toronados. My
information sources include several Toronado E-mail List contributors, the
Outlaw, and photographs showing a rebuild of a GMC Motorhomes front suspension,
which is very similar to that of our Toronados.
Not in the parts list are rotor
splash shields. Although Generation One Toronados disc brake assemblies
included splash shields (as clearly seen in the below photograph and drawings),
apparently these were never part of Generation Two Toronados. My
information sources include several Toronado E-mail List contributors, the
Outlaw, and photographs showing a rebuild of a GMC Motorhomes front suspension,
which is very similar to that of our Toronados.
http://www.gmcmotorhome.com/tech/index.html (scroll down and review the middle two Front Suspension and Final Drive links)
 Above: Generation One disc brake components. Right: note splash shield attached to the steering knuckle (image source: 1967 Eldorado repair manual). Also note on all three drawings the single-piece hub and rotor, as well as multiple names for the same parts. |
 |
|
Image source: 1968 Oldsmobile Toronado Chassis Service Manual © 1967 General Motors Corporation |
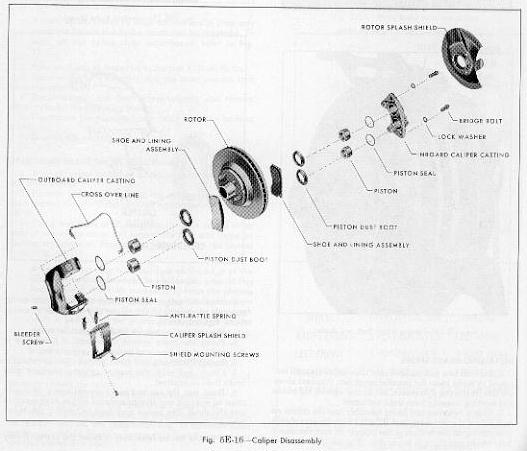 Image source: 1968 Oldsmobile Toronado Chassis Service Manual © 1967 General Motors Corporation |
The next table consists of surprise parts: those I didnt discover I needed until the technician found damage or excessive wear. I strongly recommend that you have these parts on hand before work begins. That way, work wont be interrupted while the shop owner or foreman racks up billable hours researching compatibility and ordering these parts. Theyre all inexpensive. Additionally, shops will charge for miscellaneous consumables such as primer, paint, brake fluid, media for blasting, grease, and cleanup supplies.
| Surprise Parts | |||||
|
Part Name |
Manufacturer (1) |
Part Number (2) | Quantity Required | My Source | Item Total (3) |
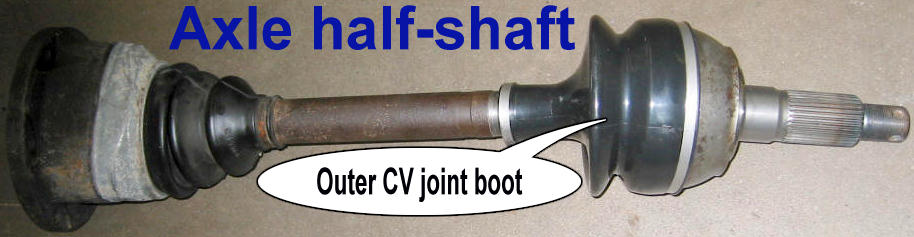
| Outer CV joint boots |
NAPA |
CTB2456 |
2 |
NAPA |
31 |
| Stabilizer bushings (4 required; 2 included per order) |
NAPA |
NCP2651927 |
2 |
NAPA |
12 |
| Stabilizer links |
NAPA |
NCP2651220 |
2 |
NAPA |
20 |
| Brake lines and fittings | 18 | ||||
| Zinc primer | 26 | ||||
| Black semigloss chassis paint | 20 | ||||
| 2 quarts DOT 3 brake fluid | 9 | ||||
| Misc. (blasting media, masking tape, grease, cleaning supplies) | 70 | ||||
| FOOTNOTES: (1) This is what I bought. In some circumstances there is a choice of different manufacturers. (2) According to aftermarket supplier, not necessarily the GM part number. (3) In $, not including sales tax or shipping costs. |
TOTAL: |
206 | |||
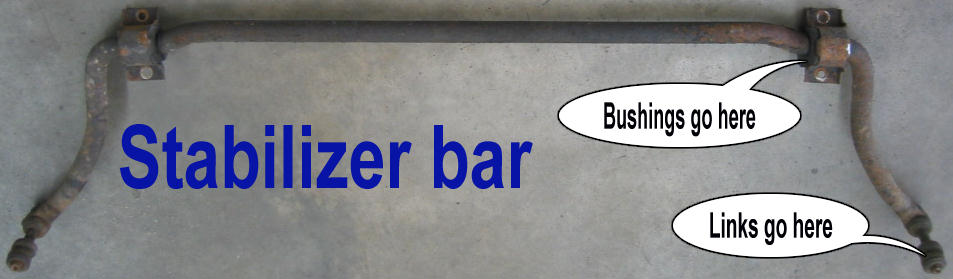
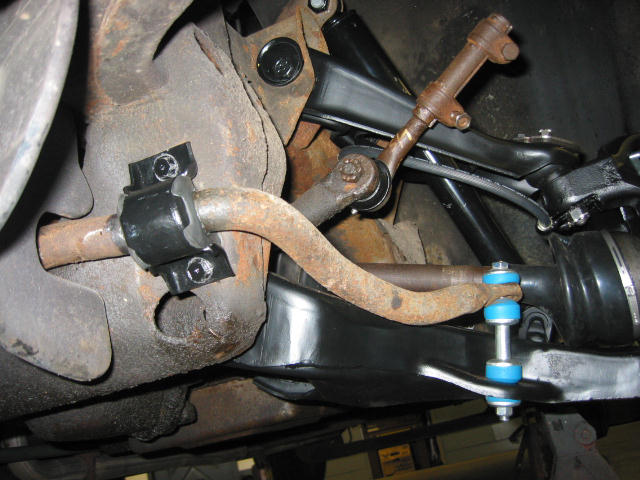
Interestingly, I have discovered that the stabilizer bar is sometimes referred to as a sway bar, and also as an anti-sway bar! Regardless, its frame attachment bushings and lower control arm links should be replaced since theyre all wear items. I didnt know that until after my Toronados conversion started. The rationale for replacing the hard brake lines is presented in the next section.
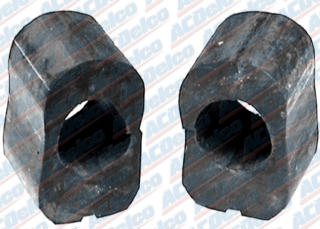 New stabilizer bushings (rubber) |
 New stabilizer links (urethane) |
And again, my suggestion is to obtain salvage parts from a 1975-1978 Toronado. If none are available, then my next choice would be a 1974, then 1973, then down to 1969. And insist that the salvage parts are from the same donor car. Identical components are also found in Eldorados of the same era. However I did not thoroughly research this and am apprehensive that the changeover years for the axle half-shafts, steering knuckles, wheel bearings, brake calipers, upper control arms and ball joints, may not be the same as with the Toronado.
Finally, when you order remanufactured and new parts, make sure the model year of the parts you order are the same as the model year of the salvage yard donor car, not your project car. Now that you have a garage full of parts, its time to begin the front drum to disc brake conversion.
III. PROCESS
The Diskenstein web page provides a concise and correct description of the conversion procedure. It became abundantly clear that I had neither the tools, space, know-how, nor time for such an elaborate automotive venture. I needed to find somebody to take on this project. Midas brake shop, the other franchise operations, and every small independent auto repair shop in my location all declined. Obviously they feared the liability associated with such an uncommon undertaking. Or perhaps they secretly doubted their own capabilities. Or maybe they were just too busy with their regular customers vehicles ongoing needs and didnt need the extra work. With a high pile of parts boxes in my garage, and nobody interested in taking my money, my choices were either to return the $1000+ in parts I had acquired and cancel this endeavor, or expand my search somehow.
One night while watching Chip Fooses weekly custom rides show on cable TV ("Overhaulin' "), or was it Boyd Coddingtons weekly custom rides show on cable TV ("American Hot Rod"), I realized that restoration shops like these tear down and rebuild cars from the ground up. They wouldnt be afraid to revise any cars braking system. Theyd be happy to take my money. I sent e-mail inquires to both of them, as well as to West Coast Customs, which is yet another restoration shop in California with a weekly custom rides show on cable TV ("Pimp My Ride"). None responded. Not even an acknowledgment and refusal. Just no response.
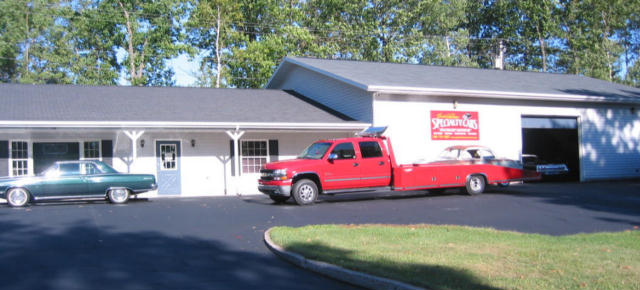
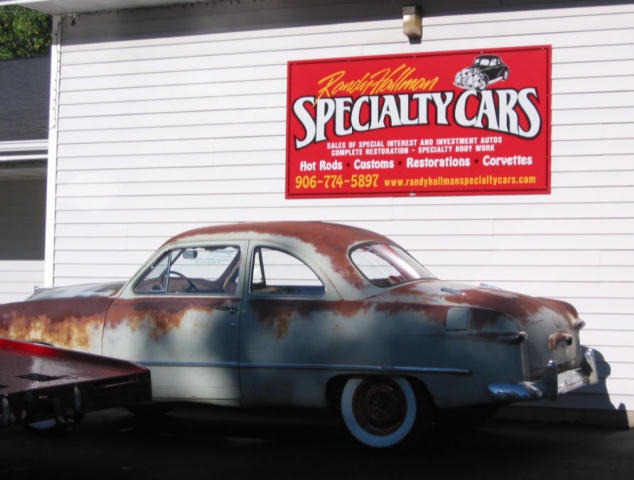
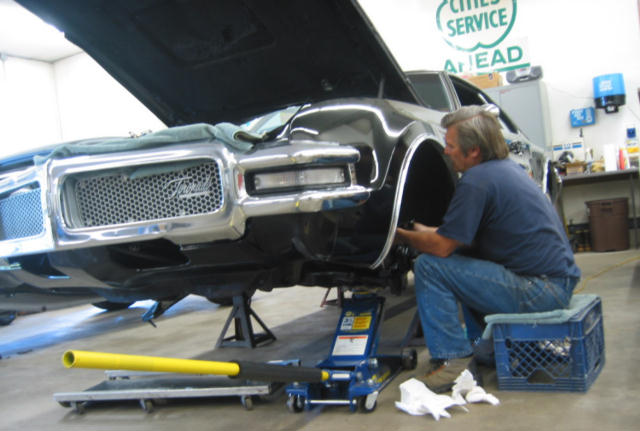
Just when I was about to give up, the planets aligned over my house again. Located in my minuscule town in Michigans Upper Peninsula is a real gem: Randy Hallman Specialty Cars. See:
www.RandyHallmanSpecialtyCars.com
The outstanding work of proprietor and master restorer Randy Hallman measures right up to that of Chip and Boyd, whom Randy knows very well. I kicked myself for not recalling Randy right away while instead wasting my time with Midas, the indies, and the aforementioned arrogant left coast outfits.
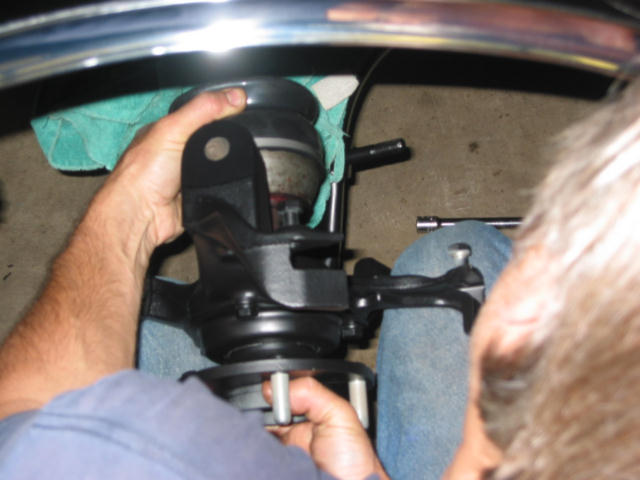
 |
 |
Randy was happy to tackle this project, and in fact was quite enthusiastic about it. He cut no corners, was always accessible, explained everything, allowed me to watch and take photographs, and his shop is so clean you could eat off the floor!
Since Diskenstein presents methodical conversion instructions, this article will not repeat what has been previously described. I will limit it to only a brief narrative of the conversion process emphasizing what I considered important, and offerings of some insight that I gained along the way.
This project was not simply a part of a frame-off or front-clip-off restoration.
Only the front brakes, suspension and steering components were worked on.
Randy's initial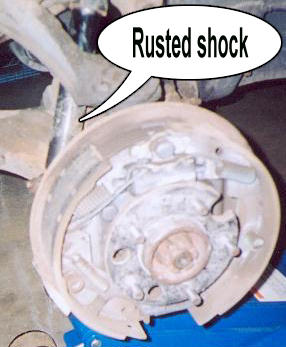
 step
was to de-grease and pressure wash the engine compartment, front end, and
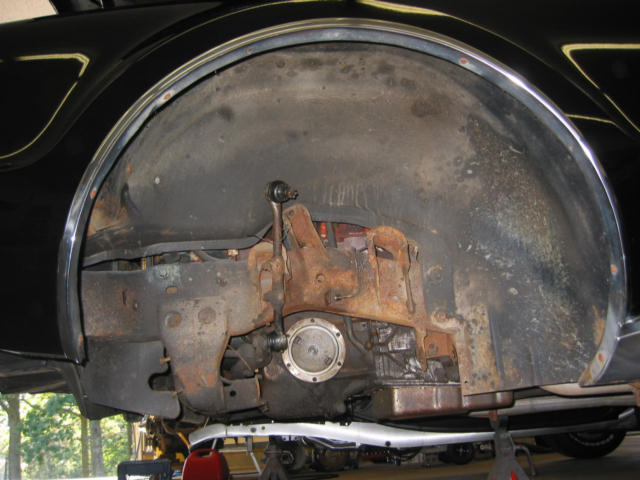
underneath the car. The disassembly procedure was straightforward.
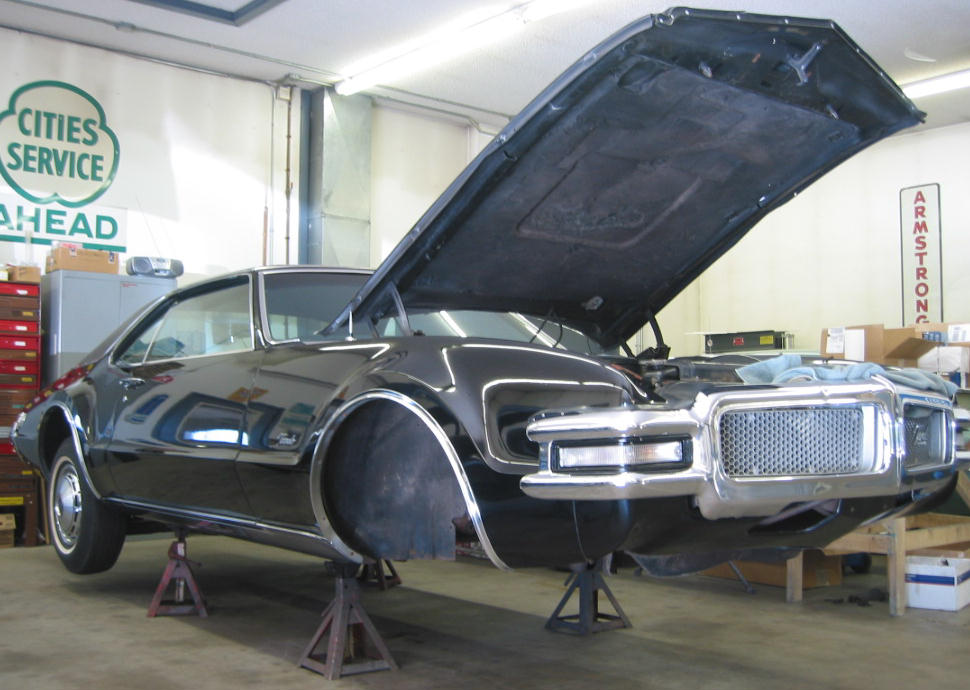
The Toronado was secured onto jack stands (click the thumbnail photo on the left
for a larger image). Then, removed were the front wheels, drum brakes,
rubber brake hoses, shock absorbers, steering knuckles, upper and lower control
arms, upper and lower ball joints, outer tie rod ends, torsion bars, stabilizer
bar, combination booster / master cylinder, proportioning valve, and hard brake
lines. The torsion bars and stabilizer bar were cleaned up but not sandblasted
or painted. However the shock absorbers were (click the thumbnail photo on
the right for a larger image). I had replaced both shortly after buying
the car, and rust was already appearing. Here are some of the removed
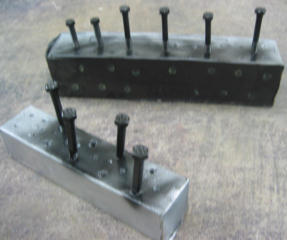
parts:
step
was to de-grease and pressure wash the engine compartment, front end, and
underneath the car. The disassembly procedure was straightforward.
The Toronado was secured onto jack stands (click the thumbnail photo on the left
for a larger image). Then, removed were the front wheels, drum brakes,
rubber brake hoses, shock absorbers, steering knuckles, upper and lower control
arms, upper and lower ball joints, outer tie rod ends, torsion bars, stabilizer
bar, combination booster / master cylinder, proportioning valve, and hard brake
lines. The torsion bars and stabilizer bar were cleaned up but not sandblasted
or painted. However the shock absorbers were (click the thumbnail photo on
the right for a larger image). I had replaced both shortly after buying
the car, and rust was already appearing. Here are some of the removed
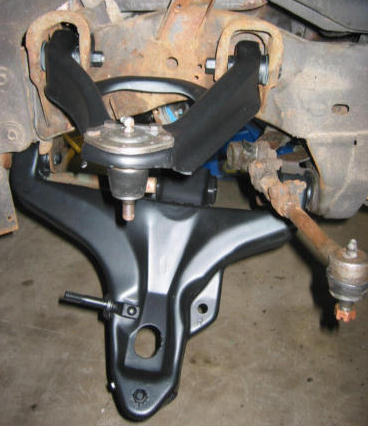
parts:
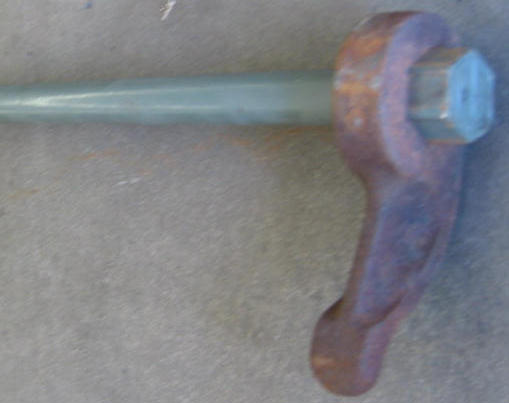
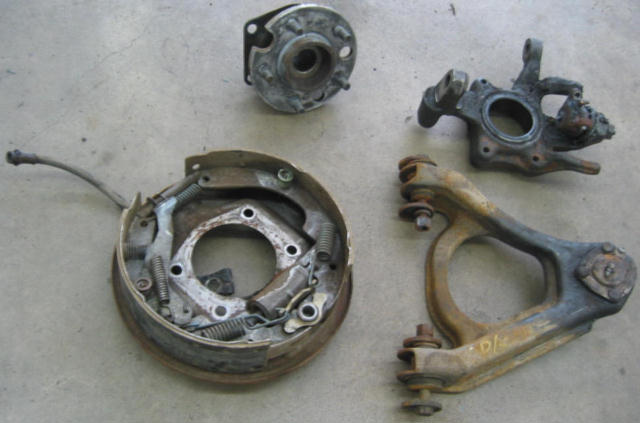 Clockwise from top: spindle, steering knuckle, upper control arm, drum brake |
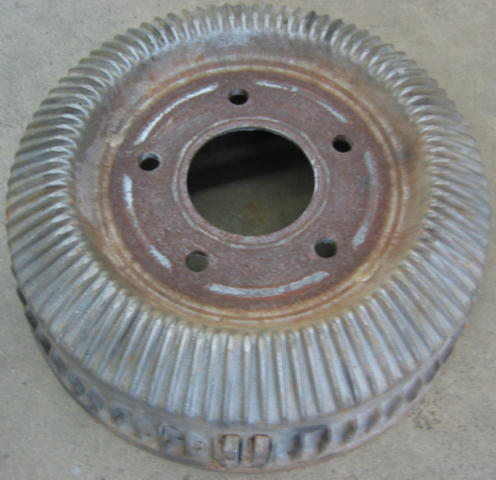
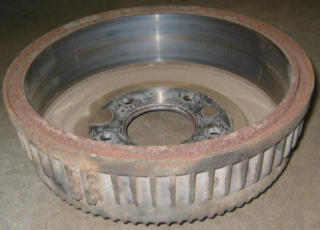 Brake drum |
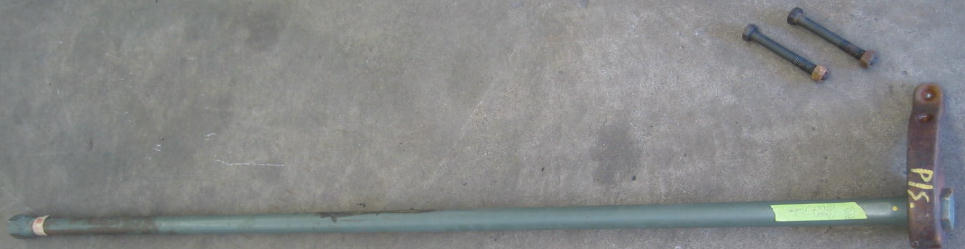 Torsion bar with attachment hardware (after being cleaned up) Stabilizer bar was shown previously |
|
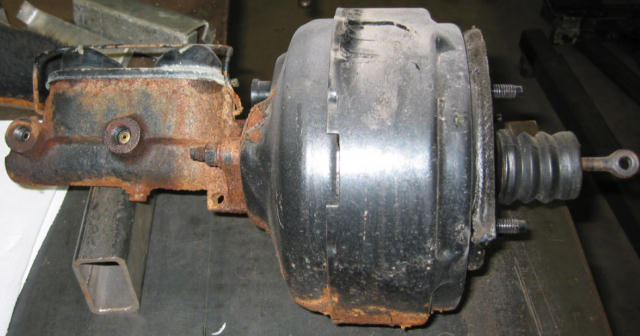 Old combination booster / master cylinder |
 Another view of the torsion bar's attachment hardware |
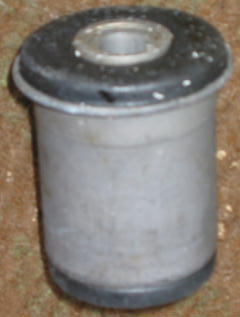
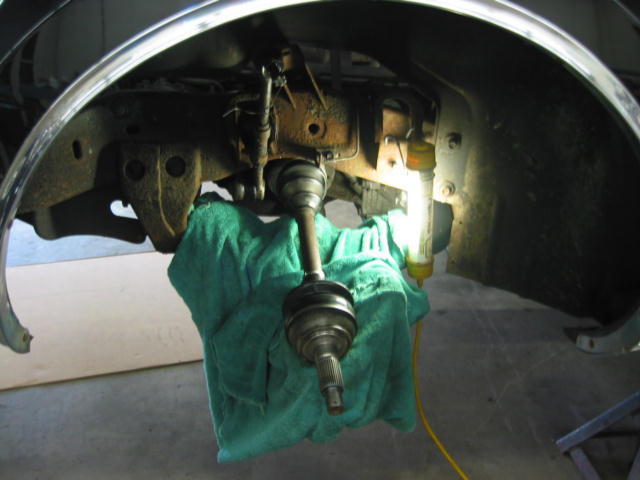
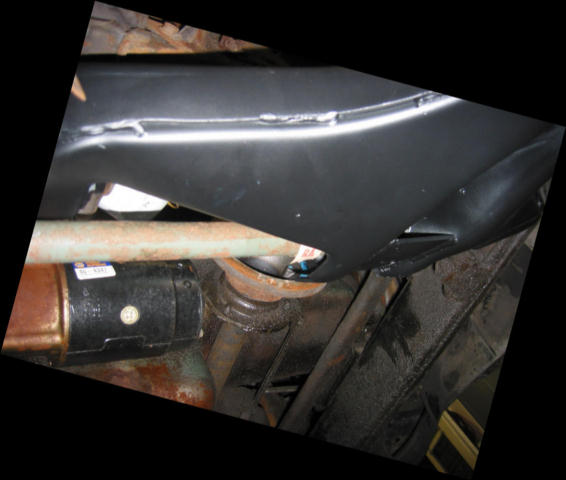
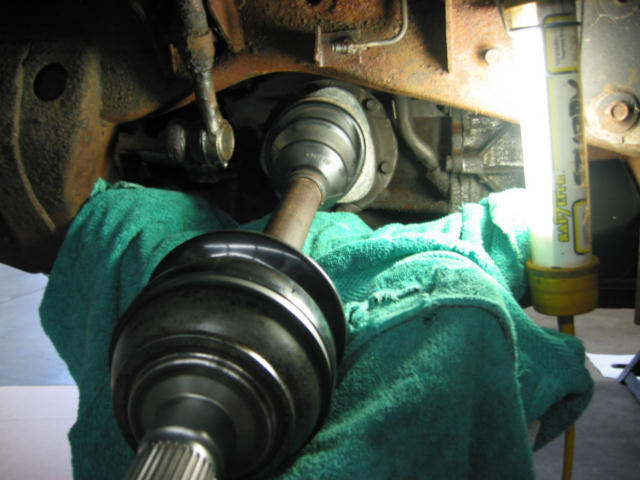
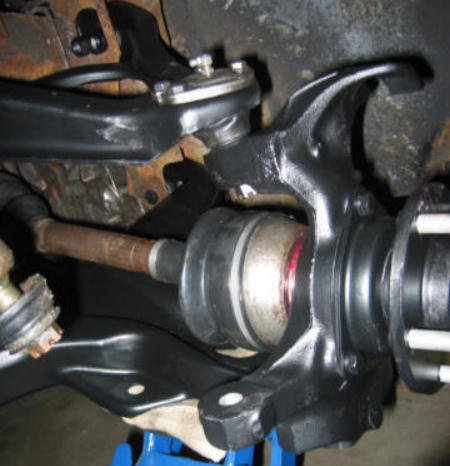
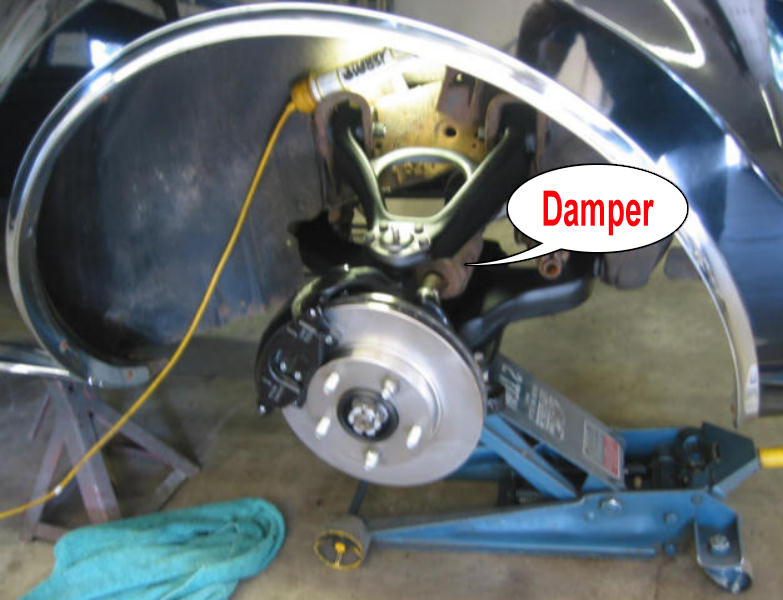
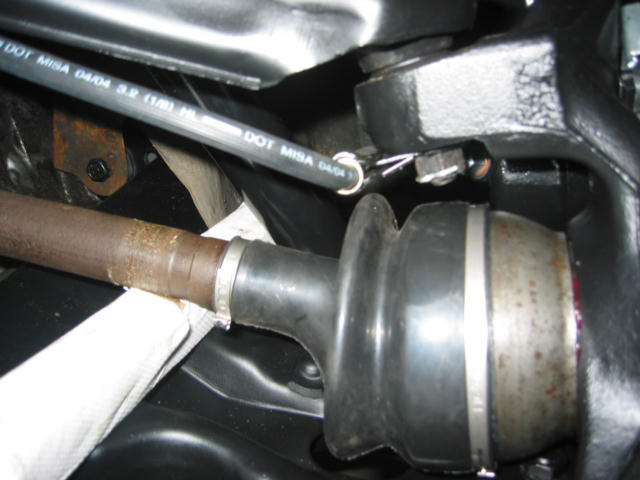
With the steering knuckles removed, it became readily apparent that the left axle half-shafts outer CV joint boot had ruptured, spewing dirty grease everywhere. Prudence and opportunity demanded that both half-shafts be removed as well, for a more detailed inspection. The involved outer CV joint was disassembled, cleaned, re-greased, and reassembled with a new boot. I had the other one done as well, since its boot, though intact, seemed too deteriorated. Both inner CV joint boots appeared perfect, fortunately, and therefore were left alone.
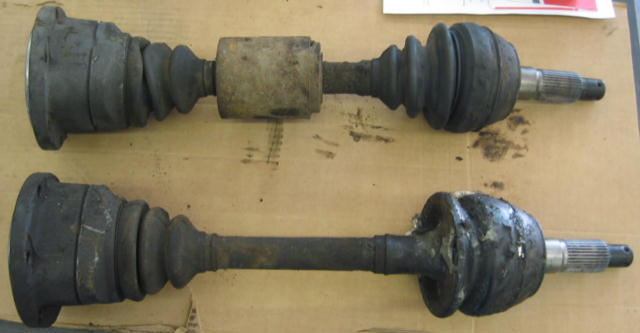 Right axle half-shaft on top - note presence of
mechanical damper
Left axle half-shaft on bottom - note presence of grease explosion
Right axle half-shaft on top - note presence of
mechanical damper
Left axle half-shaft on bottom - note presence of grease explosion
|
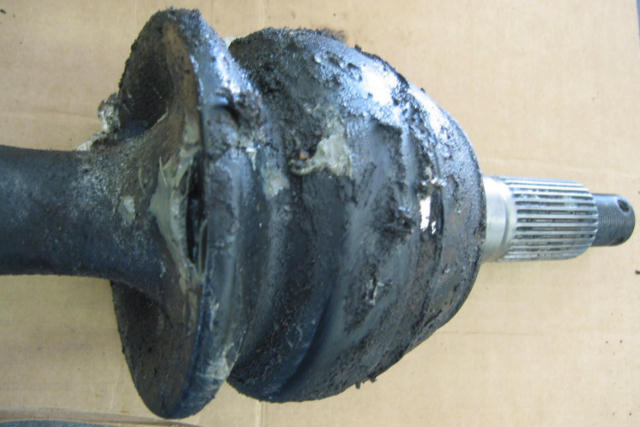 Enlarged view showing "ventilation" holes |
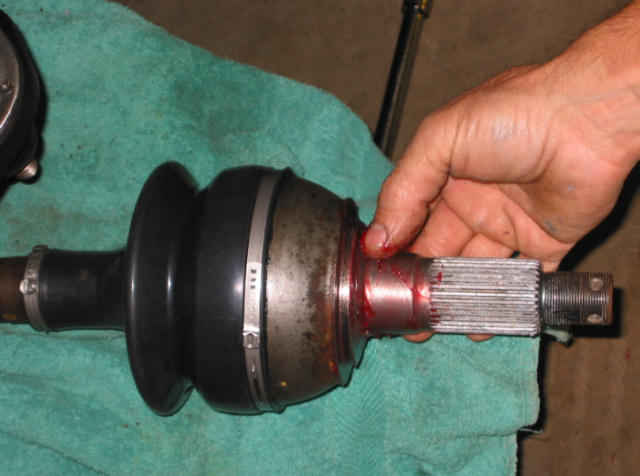
| Shown previously (just beneath the Surprise Parts table) is a photo of the left axle half-shaft after its thorough cleaning and the outer CV joint boot replacement. | |
This was an unexpected surprise that cost me dearly for parts and additional labor. However with the front wheel systems already disassembled all the way to the half-shafts, the additional cost was minimal compared to what it may have been had the ruptured boot been discovered after everything was reassembled and the car was back on the road. As such, I strongly recommend that every Generation One Toronado undergoing a front disc brake installation also have its half-shafts removed for a detailed inspection. And you should seriously consider adding new outer CV joint boots to your purchase list just in case. If you end up not using them, just keep them for future use rather than returning them. Theyre not too expensive.
The lower control arms were also sandblasted and painted, and their associated bushings were replaced. This added heftily to the labor charge, but they sure look nice now, and the bushings are wear items anyway.
 Lower control arm after sandblasting |
 Lower control arm after painting |
The original steering knuckles, upper control arms, upper and lower ball joints, outer tie rod ends, combination booster / master cylinder, proportioning valve, and rubber brake hoses were all discarded. The original front wheels were retained for a future eBay auction, and the original front brake drums were turned, sandblasted and painted for future use as rears. Next years project will involve replacing all four rear shock absorbers, wheel bearings and worn drum brake components, as well as installing the newly painted brake drums, and obtaining new multi-leaf springs and bushings. Stay tuned; a report on that will be issued when completed.
Next began the re-assembly. The left side was re-assembled first while waiting for a second outer CV joint boot (it was backordered). This part delay, which led to an asymmetric re-assembly, turned out to be a blessing. Re-assembly photographs can be seen in Appendix B, below.
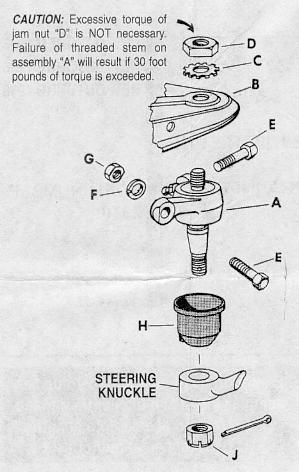
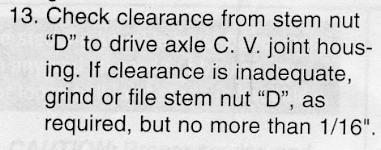
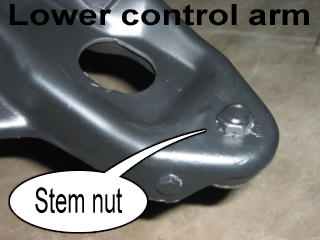
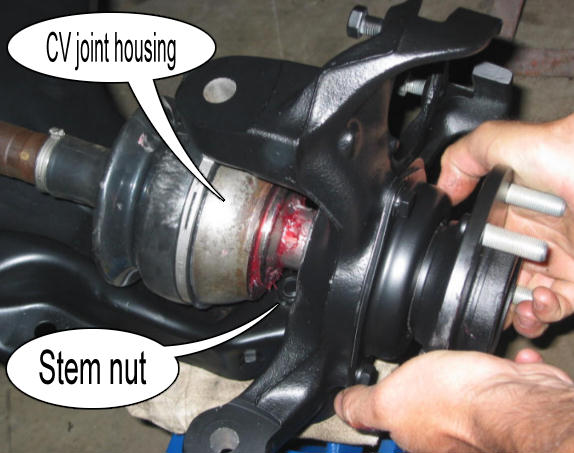
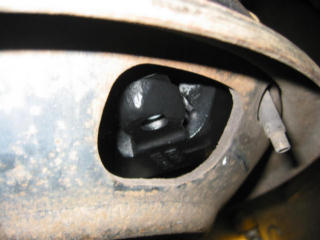
After installing the left axle half-shaft, upper and lower control arms and ball joints, steering knuckle and torsion bar, a problem became apparent. The hardware attaching the lower ball joint to the lower control arm protruded upwards too much. This rubbed the half shafts outer CV joint housing during much of the steering knuckles vertical movement; for example, when driving over a speed bump. This problem and its solution were revealed in the lower ball joints installation manual, which was consulted after discovery of the impingement. From the lower ball joint installation manual:
|
|
|
|
|
|
|
|
|
|
View from top. Axle half-shaft and steering knuckle are not yet in their correct positions. |
 View from front. Axle half-shaft and steering knuckle are now in their correct positions. |
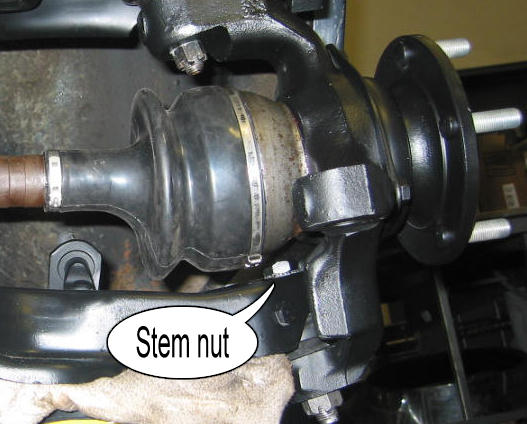
To get to that stem nut, much of what was
assembled had to be removed. The stem nut, as well as the one for the
right side (which was still in its box) was ground down as instructed. The
components were then reassembled and proper hardware clearance confirmed.
If you dont want this nasty nut surprise, then grind them both in advance, or
else youll also have to pay the additional labor charges to disassemble then
reassemble everything when you too discover that the stem nut indeed rubs the
outer CV
joint housing. Luckily for me, the right side re-assembly hadnt yet been
started
when this product flaw was realized, or else I would have had to pay for double
the additional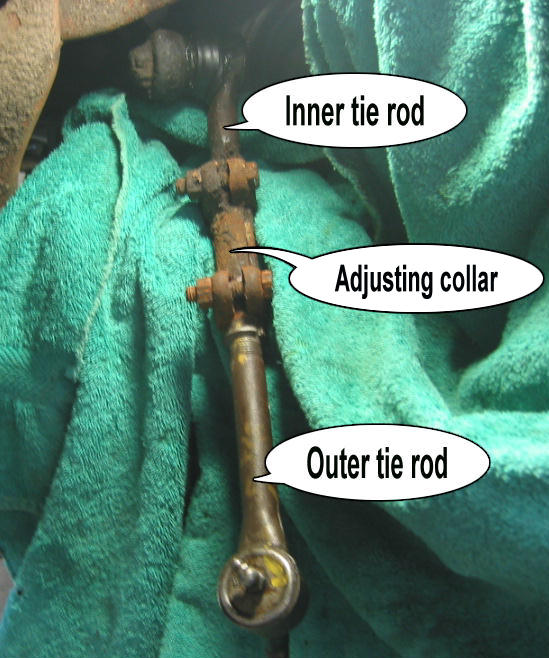 labor necessary for its remedy.
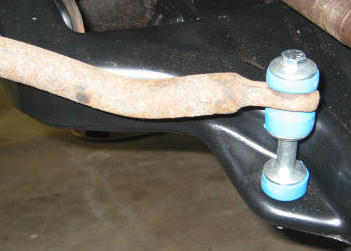
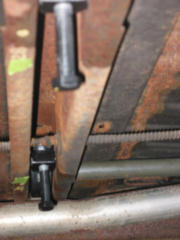
Another interesting detail concerns the outer tie rod ends. Curiously, the left and the right outer tie rod ends both have a left-hand thread twist pattern. So remember that when you or your mechanic tries to install them into the adjusting collars. In this unconventional case, righty equals loosy and lefty equals tighty! The collars (also known as sleeves), as well as the inner tie rod ends, need not be replaced unless excessively worn or damaged, which is unlikely. Click the thumbnail photo on the right for a larger image.
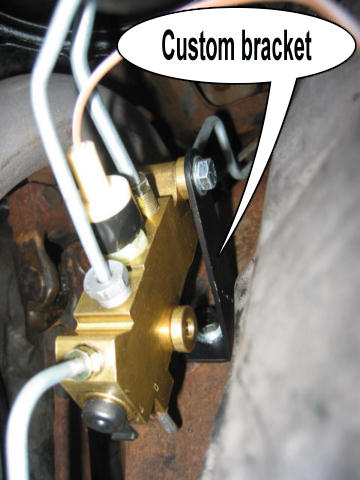
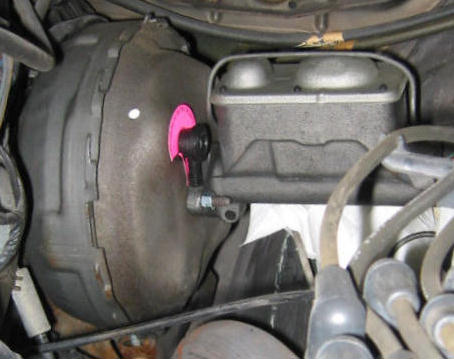
The combination booster / master cylinder was installed just to test fit. It is larger than one original one so a test fit is crucial. This will also facilitate selecting a position on the frame to mount the new proportioning valve. To properly install the proportioning valve, an "L" shaped bracket is necessary. The Diskenstein website also has photos of this. If you or your installer cannot obtain one off the shelf, then this will have to be fabricated. This can be done at a machine shop or sheet metal supplier, if your installer hasnt the necessary tools.
|
|
|
|
The old hard brake lines will have to be disconnected from the
original master cylinder and proportioning valve early in the disassembly. This presents a good opportunity to
replace the old hard lines, which may have suffered crimped bends and rust.
They may have rusted to the extent that they cannot be removed from their attach
points without damaging them. Even if not visibly damaged, just as with wheel bearings,
replacement of the hard lines is easier now. Besides, replacement of the
master cylinder and proportioning valve may render the old lines incapable of
correctly bending to fit into these new connections. So plan on bending
and flaring new lines. These were yet additional surprise parts for me.
They wont be for you.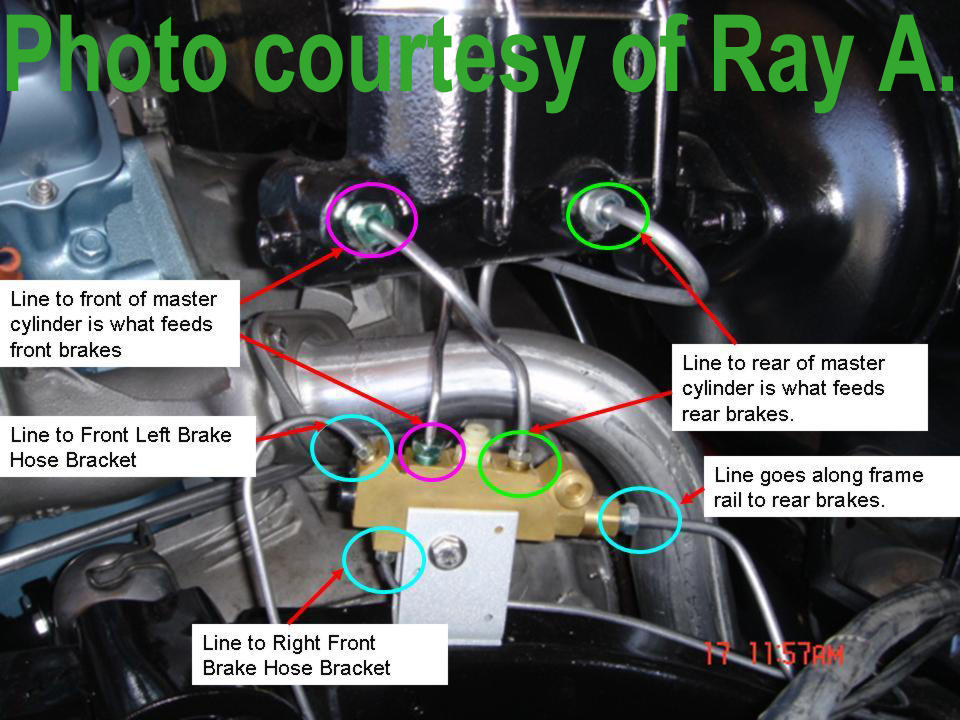
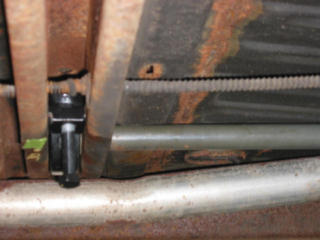
So how is all this new plumbing coupled to the new proportioning valve? A picture is worth a thousand words. Click the thumbnail photo on the right for a larger image. Also on this plumbing photo is a slightly different proportioning valve bracket design (because this photo is of somebody else's Toronado).
Lastly, if your desire is an attractive installation, parts such as the calipers and the combination booster / master cylinder should be painted prior to their final installation. These remanufactured parts will be shipped freshly cleaned and blasted, but not painted. If theyre installed without first being painted, then they will become surface rusted and, "look like crap in a week." Well said, Ray.
|
Combination booster / master cylinder, before painting |
Combination booster / master cylinder, after painting |
IV. CONCLUSION
The front tires were removed from the drum brake wheels, mounted on the disc brake wheels and balanced. These were then secured onto the front hubs, followed by a short drive to another shop where the necessary front end alignment was performed. The brief road test prior to the alignment, as well as another one after the alignment which included several hard test stops, confirmed that the conversion was safe and successful.
Randy Hallman bills for labor by the hour. Readers of this article interested in retaining his automotive expertise should discuss rates privately with him. Approximately 90 hours of labor were billed for this conversion project. This was influenced by the fact the only labor I provided was lifting my pen and signing the checks. I'm sure that Toronado owners who are familiar and experienced with automobile maintenance and repair can reduce their bill considerably by getting their hands dirty. That was not an option for me, and I paid dearly for the privilege. Overall, Randy provided excellent service and I would not hesitate to have him work on my Toronado again.
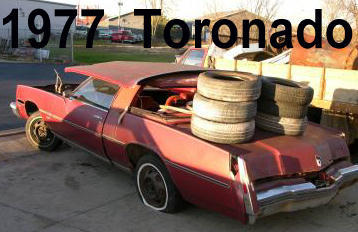 Fortunately,
mid-1970s Toronado parts cars currently remain plentiful. However if you
plan to convert your car's front drum brakes to discs now or in the future, it
might be a good idea to obtain donor car parts now rather than later. As
demand increases and the finite supply dwindles, the price for these parts heads
only in one direction. As detailed above, at a minimum you will need the
steering knuckles, upper control arms, and two or three wheels from the donor
car. To keep
your parts acquisition costs down, you can also obtain the rotors, calipers, outer tie rod ends,
upper and lower ball joints, flexible brake hoses, proportioning valve,
combination booster / master cylinder, and make sure the wheel bearings and
upper control arm bushings are all present. In this parts car that was
recently auctioned on eBay, the engine and transmission were missing, but all
the brake parts were there for the taking. The winning bid was fifty
dollars!
Fortunately,
mid-1970s Toronado parts cars currently remain plentiful. However if you
plan to convert your car's front drum brakes to discs now or in the future, it
might be a good idea to obtain donor car parts now rather than later. As
demand increases and the finite supply dwindles, the price for these parts heads
only in one direction. As detailed above, at a minimum you will need the
steering knuckles, upper control arms, and two or three wheels from the donor
car. To keep
your parts acquisition costs down, you can also obtain the rotors, calipers, outer tie rod ends,
upper and lower ball joints, flexible brake hoses, proportioning valve,
combination booster / master cylinder, and make sure the wheel bearings and
upper control arm bushings are all present. In this parts car that was
recently auctioned on eBay, the engine and transmission were missing, but all
the brake parts were there for the taking. The winning bid was fifty
dollars!
Good luck and happy Toro-ing!
Finally, I wish to thank the Toronado community for the phenomenal support I received in the form of information, advice, encouragement, and solutions. Please forgive me if sources of the quotations in this article, and the names of all the extraordinarily knowledgeable people who helped me, are not all mentioned. Once again, I strongly recommend joining the Toronado Owners Association.
To close this report, here are some important words of wisdom:
| article entitled: | Stop It! Upgrading Old Olds Drums to New Discs | "Of all the jobs you can do on a car, the brakes are one you want to be absolutely right. Your life is literally depending on it." | ||
| magazine: | Muscle Car Review | |||
| issue date: | Spring 2005 |
| by | David Breznick, MD |
 |
| Anesthesiologist & Toronadologist | ||
| TOA # 99 | ||
|
The End |
V. APPENDIX A: Cost Summary
| Item | Cost |
| Conversion parts | 1120 |
| Surprise parts | 206 |
| Wheel mount & balance | 24 |
| Front end alignment | 50 |
|
SUBTOTAL: |
1400 |
| Labor charge (approximately 90 hours) |
$$$$$$! |
VI. APPENDIX B: Supplemental Photographs
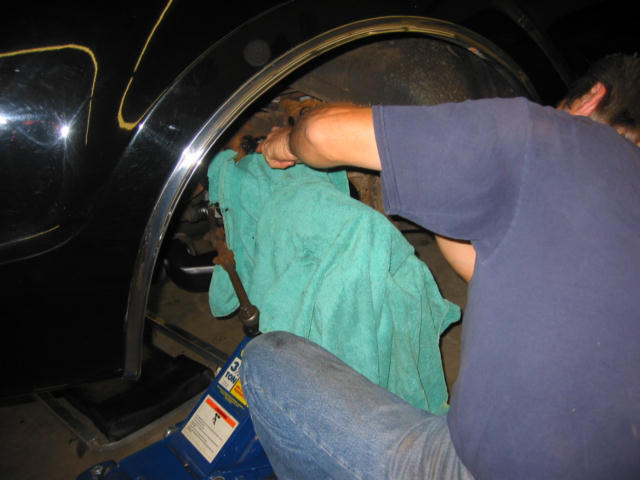
 A comfortable work height is essential to safety; and have a jack available to hold very heavy suspension parts up into place. |
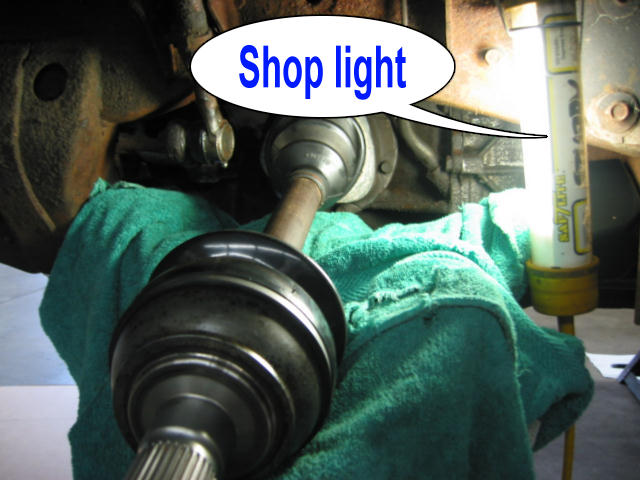 . .Bright task lighting facilitates work progress. |
 Use old towels to protect parts from scratches and damage. |
 All removed parts were sandblasted, primed and painted . . . |
 including hidden parts like the torsion bar attachment hardware . . . |
 and miscellaneous bolts. |
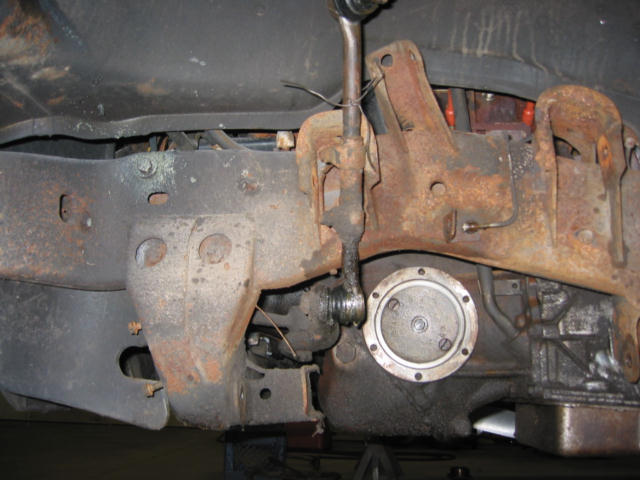
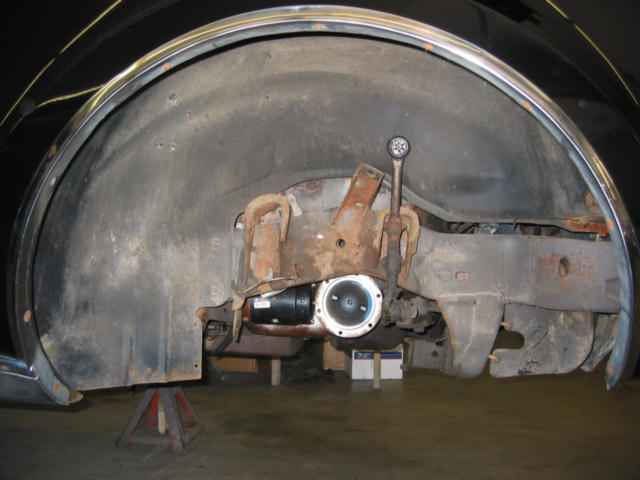
 Left side disassembly clear down to the final drive. |
 Note steering tie rods temporarily tied up and out of the way. |
 Note Toronado's massive final drive. |
 Right side disassembly clear down to the final drive. |
 Note hard brake line detached from its frame bracket. Attaching to the other side of the bracket would be the flexible brake hose. |
 View from above (this is the left side). |
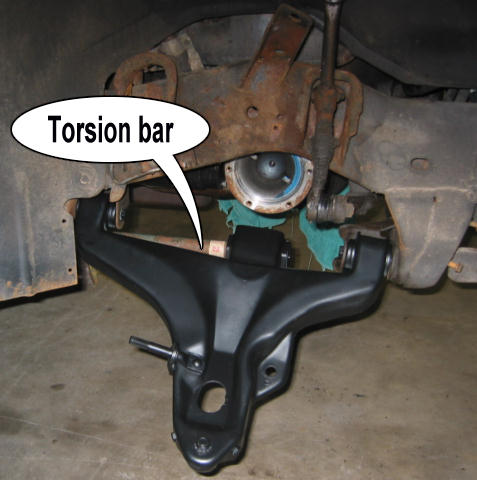 To begin re-assembly, install lower control arm and torsion bar. The next row shows more torsion bar photos. |
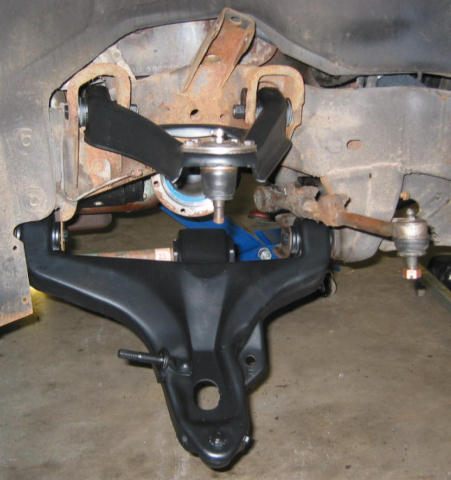 Install upper control arm. Ball joints should already have been attached to the control arms. |
 Another view of work completed so far. |
 View from below: torsion bar's connection to lower control arm. |
 And to transverse frame rails amidship, er, car. |
 Close-up view. |
 Install axle half-shaft. |
 Note yours truly, the photographer's reflection, on the fender. |
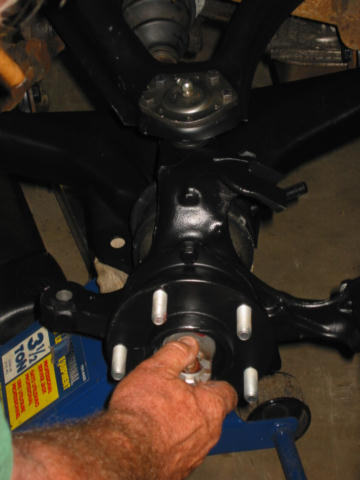
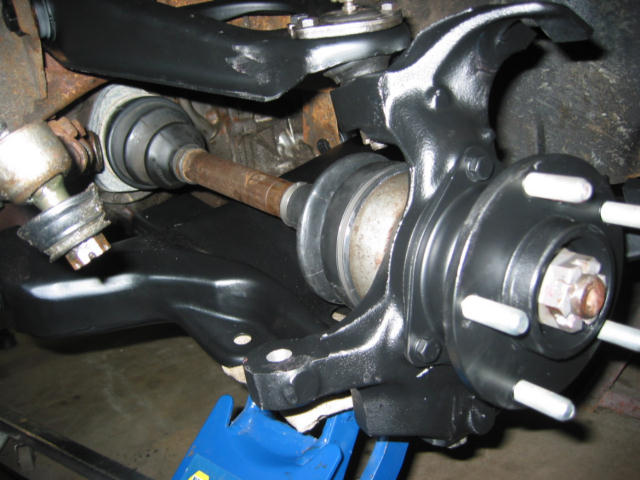
 Apply plentiful bearing grease. This steering knuckle goes on next. |
 Pre-grease the axle stub before installing the steering knuckle, just in case theres a spot in the bearings that didnt get grease. |
 A gentle force is required to install the steering knuckle, and the spindle is rotated to align the axle splines with the bearing. |
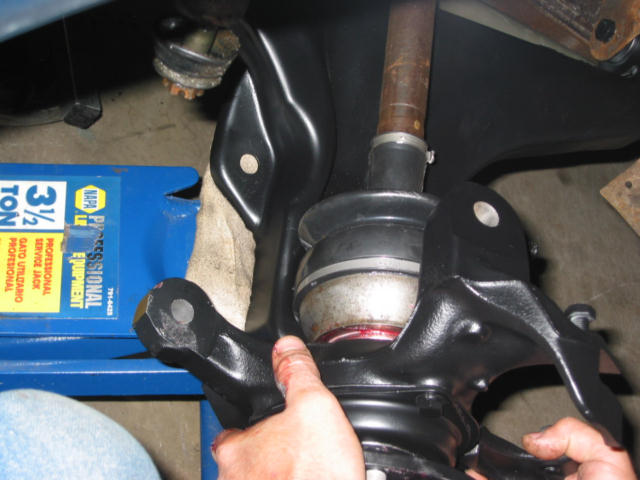 Note the jack holding up the lower control arm, and the towels protecting everything from everything (in this and other photos). |
 Slide the knuckle inward, then . . . |
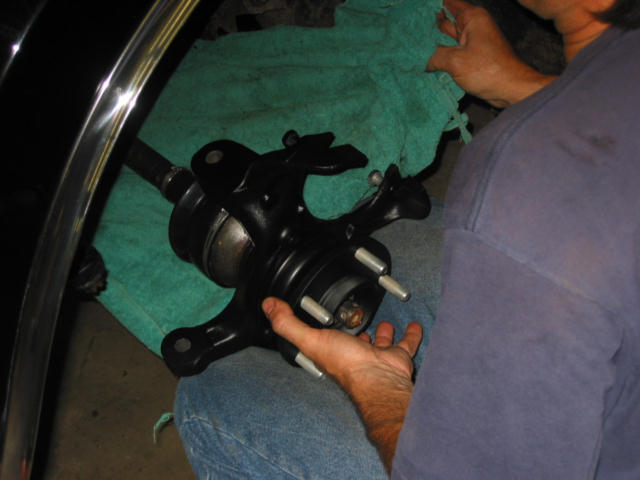 Voilà. The heart was transplanted. Next connect all the arteries. |
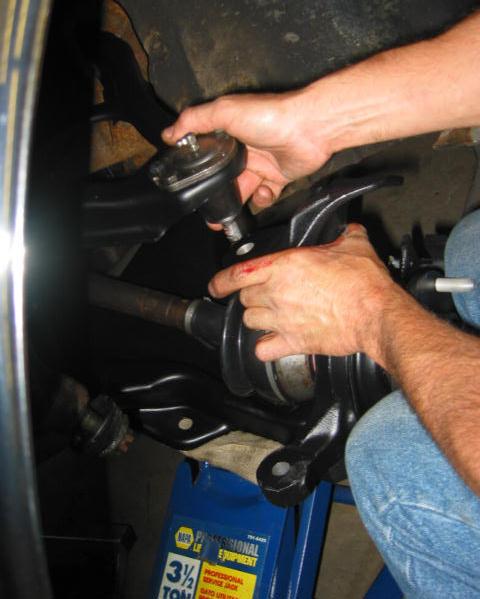 Connect the upper ball joint to the steering knuckle. |
 Push down a bit on the upper control arm. |
 Attach and finger tighten the upper ball joint's castle nut. See it just above the outer CV joint boot (compare to photo at left). Do not torque attachment hardware to specifications or insert cotter pins until all components have been installed. |
 Connect the lower ball joint to the steering knuckle.
Don't forget to protect everything by using towels. |
 Apply but do not torque the castle nut. |
 Turn the steering knuckle through its complete range of motion, making sure nothing binds, scrapes, or contacts. |
 View from the other side. |
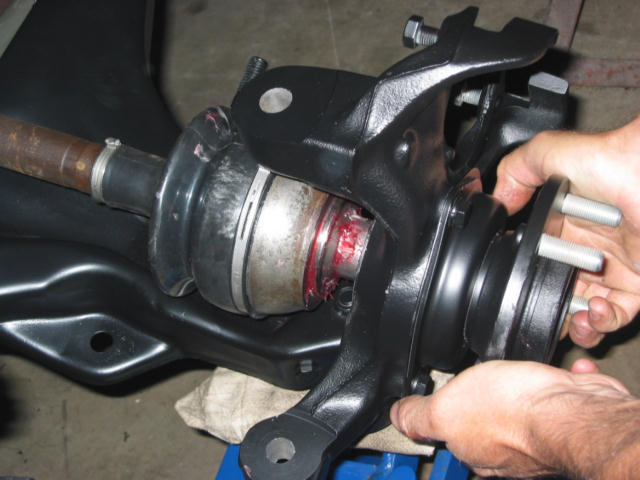
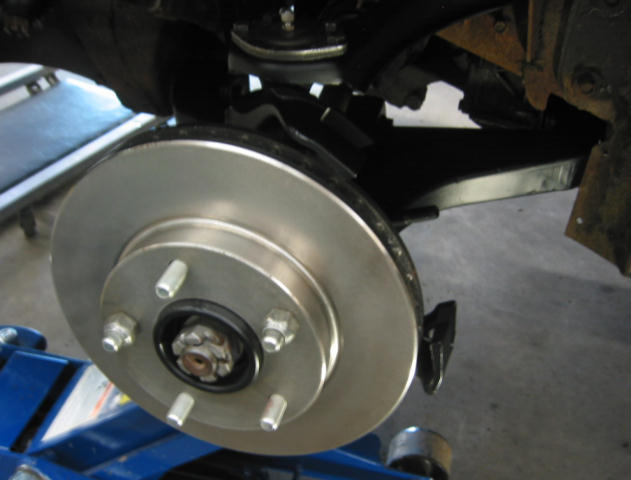 Install the rotor, but do not tighten the bolts yet. |
 Attach the flexible brake hose to the caliper, and the caliper to the steering knuckle. |
 Note the jack has been removed. Prior to its removal, place a block of wood covered in some padding to protect the axle. |
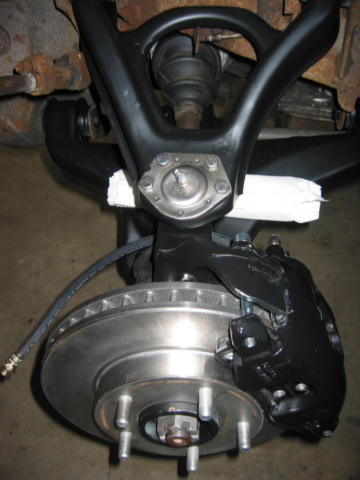 View from above. |
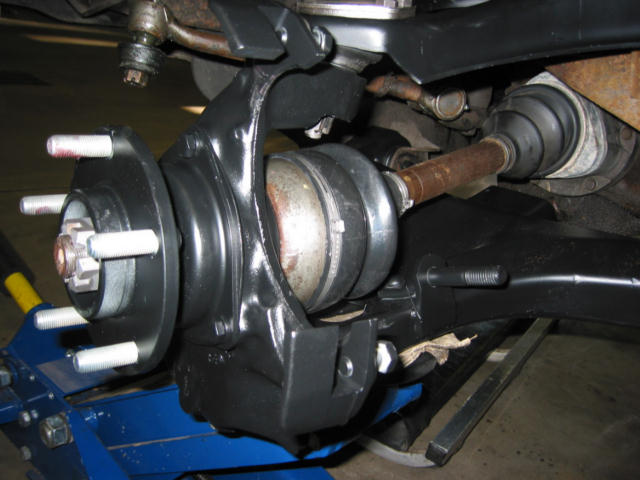
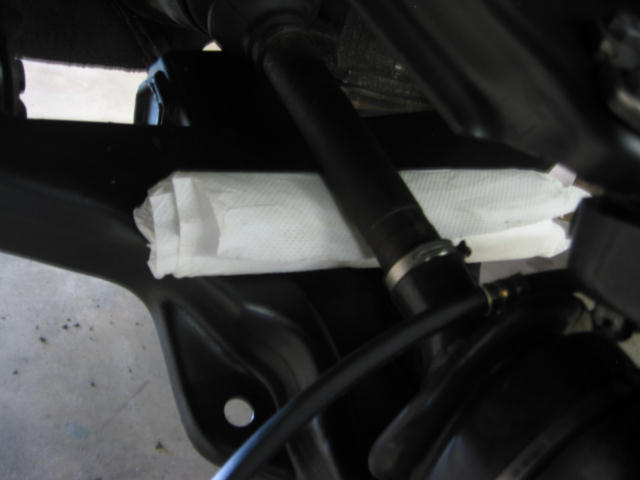
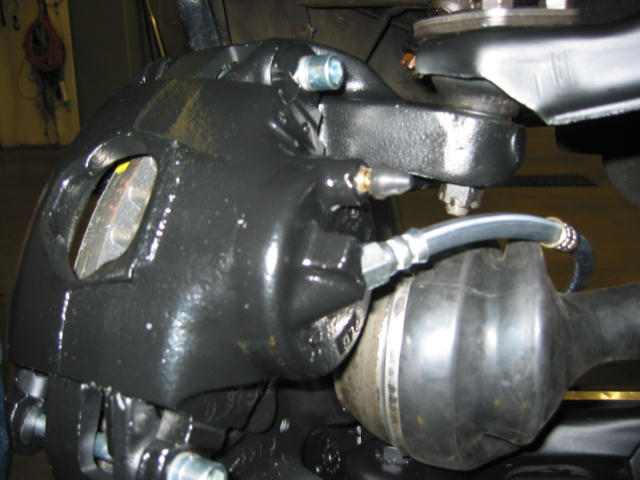 View of caliper showing attachment of flexible brake hose. Note how the hose is resting on the outer CV joint boot. See below for how this problem is solved. |
 Another view of caliper clearly showing rotor within. |
 Install the shock absorber. Despite use of plenty of towels, the top half of the freshly painted new shock absorber got scratched. Twice. Yikes. |
 Finally the other outer CV joint boot arrived, so work began on the right side. Note again the damper is on the right axle only. |
|
 Install the stabilizer bar. |
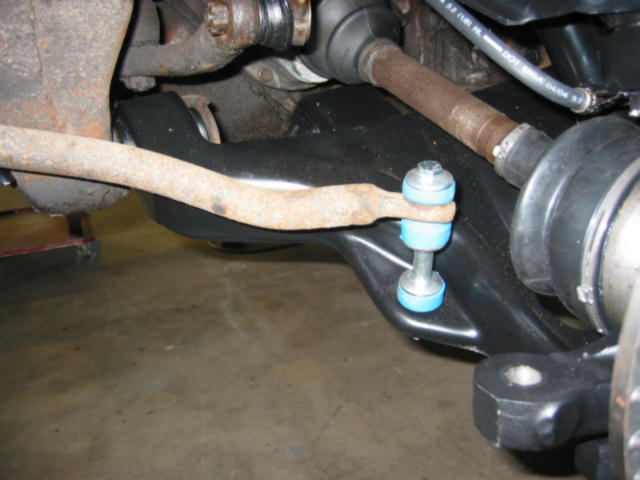 Another view of the stabilizer bar. |
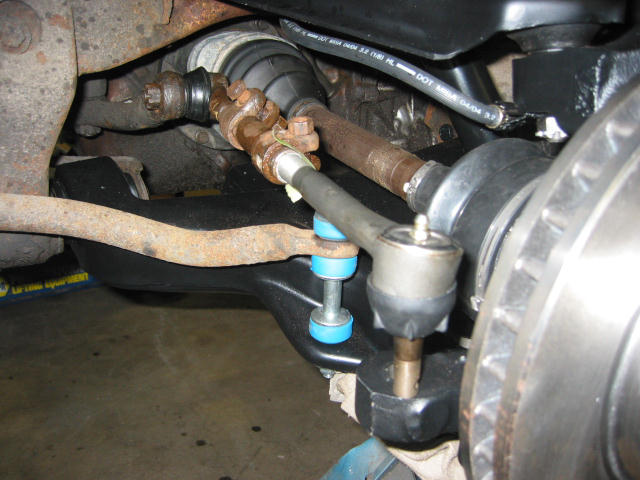 Connect the outer tie rod end. |
 This is the right side; again note the axle damper. |
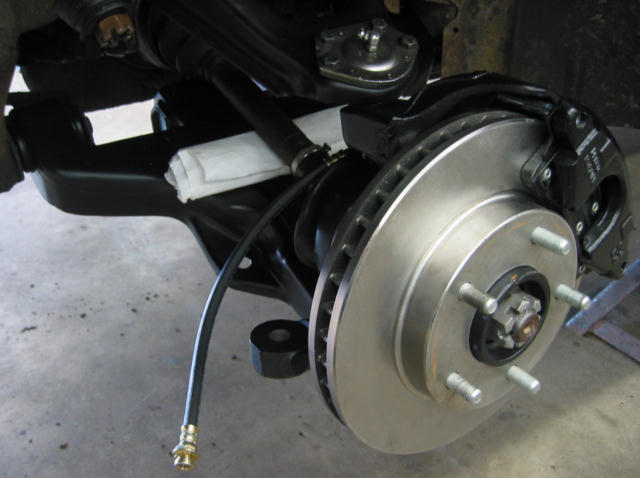
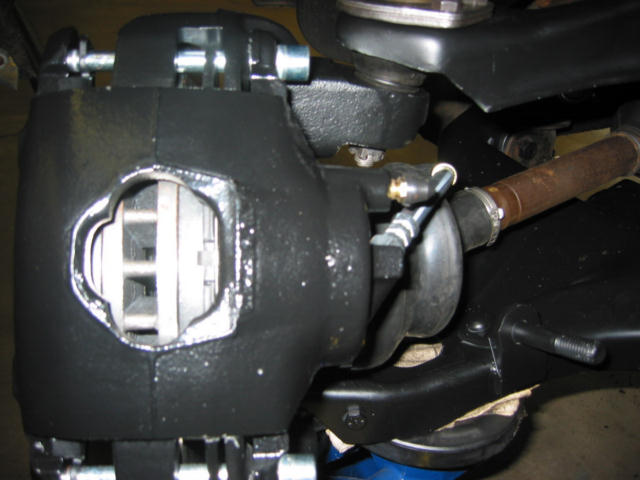
 Attach the flexible brake hose to its clip that positions it clear of the outer CV joint boot. |
 This photo depicts the routing of the flexible brake hose from the bracket (upper left), through the clip, then into the caliper. |
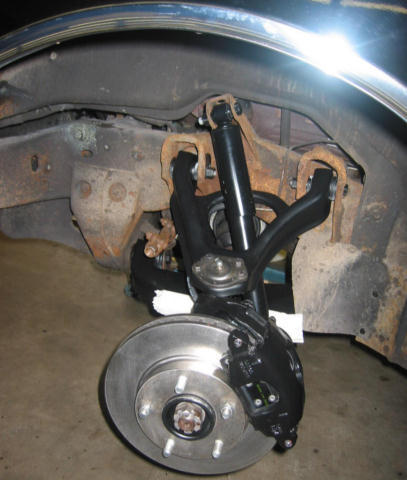
 Wheel test fit. |
 Well clear of caliper. |
 Finished product (minus hubcap). |